Find Your Ancestral Land in UP उत्तर प्रदेश में पैतृक भूमि खोजें

How to Find & Map Your Ancestral Land in UP उत्तर प्रदेश में अपनी पैतृक भूमि कैसे खोजें और मानचित्रित करें

A step-by-step guide using free government portals and AI — no technical background required. सरकारी पोर्टल और AI का उपयोग करके चरण-दर-चरण मार्गदर्शिका — कोई तकनीकी ज्ञान आवश्यक नहीं।

📄 Official land records 🗺️ Plot boundary maps 🛰️ Satellite overlay 📄 आधिकारिक भूमि अभिलेख 🗺️ भूखंड सीमा मानचित्र 🛰️ उपग्रह दृश्य

Before You Start शुरू करने से पहले

📋
A Khatoni (खतौनी)एक खतौनी Your village land record document (PDF)अपने गाँव का भूमि अभिलेख (PDF)
🤖
Claude accountClaude खाता Free tier at claude.aiclaude.ai पर निःशुल्क
🌐
Google accountGoogle खाता For Google My Maps (free)Google My Maps के लिए (निःशुल्क)
🖥️
Google ChromeGoogle Chrome Recommended browserअनुशंसित ब्राउज़र

⏱️ Estimated time: 2–3 hours total, depending on how many plots you have. ⏱️ अनुमानित समय: आपके भूखंडों की संख्या के आधार पर कुल 2–3 घंटे।

⚠️ Please Read Firstपहले कृपया पढ़ें

The 7 Steps 7 चरण

1
Set Up Claude Claude सेट अप करें

What is Claude? Claude is a free AI assistant made by Anthropic. In this tutorial you'll use it to read your Khatoni PDF and later to process your map coordinates. No technical knowledge is needed — you simply type questions and instructions in plain language. Claude क्या है? Claude, Anthropic द्वारा बनाया गया एक निःशुल्क AI सहायक है। इस ट्यूटोरियल में आप इसका उपयोग अपनी खतौनी PDF पढ़ने और बाद में मानचित्र निर्देशांक प्रोसेस करने के लिए करेंगे।
1
Go to claude.ai and create a free account using your email address. claude.ai पर जाएं और अपने ईमेल से निःशुल्क खाता बनाएं।
2
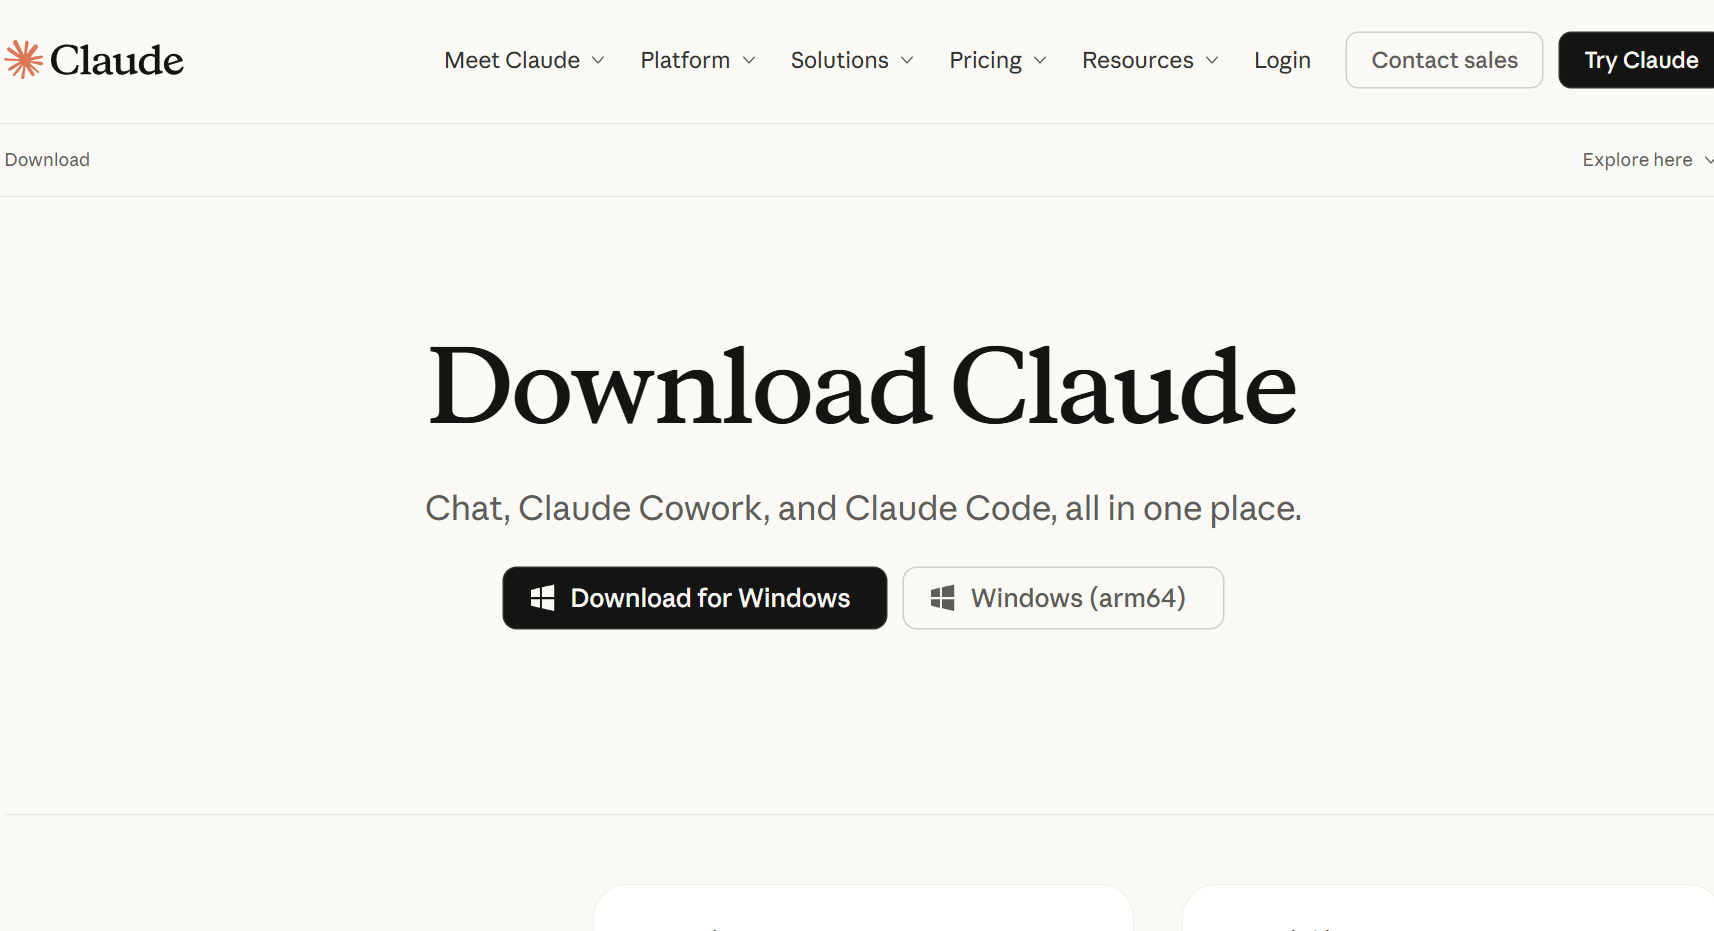
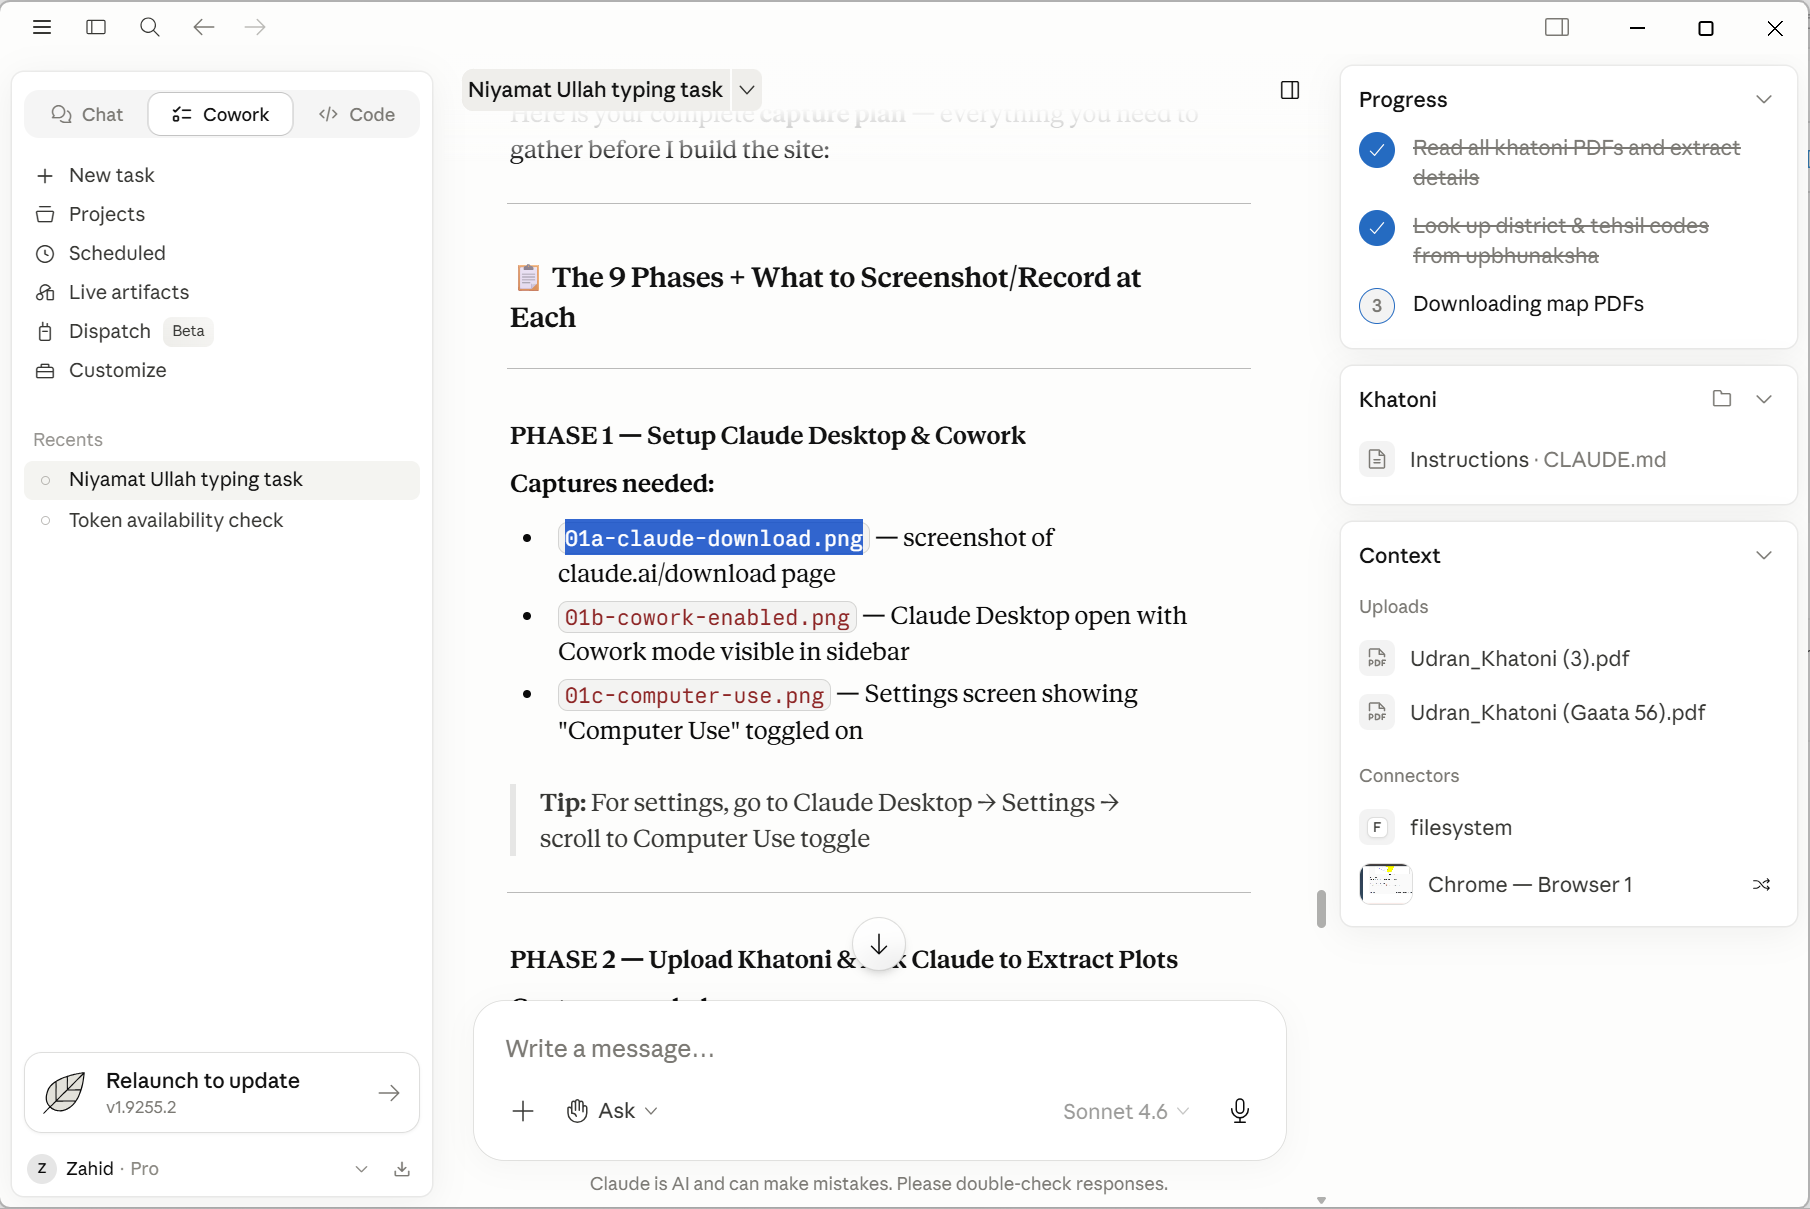
You can use Claude directly in your browser — no download required. Optionally, you can download the desktop app (shown in the screenshot below) but it is not necessary. आप Claude को सीधे अपने ब्राउज़र में उपयोग कर सकते हैं — कोई डाउनलोड आवश्यक नहीं। वैकल्पिक रूप से, आप डेस्कटॉप ऐप डाउनलोड कर सकते हैं लेकिन यह जरूरी नहीं है।
3
Once logged in, you'll see a chat interface. This is where you'll type your instructions throughout this tutorial. लॉगिन करने के बाद, आपको एक चैट इंटरफेस दिखेगा। इस ट्यूटोरियल में आप यहीं अपने निर्देश टाइप करेंगे।
Claude download page
The Claude download page — your browser version will look similar once logged inClaude डाउनलोड पेज — लॉगिन के बाद ब्राउज़र संस्करण इसी तरह दिखेगा
Claude interface
Claude's chat interface — type your instructions in the box at the bottomClaude का चैट इंटरफेस — नीचे के बॉक्स में अपने निर्देश टाइप करें
2
Extract Your Plot Details from the Khatoni खतौनी से भूखंड विवरण निकालें

What is a Khatoni? A Khatoni (खतौनी) is an official government document that lists the land plots registered under a family's name in a particular village. It includes the village name and code, owner names, plot numbers (called Gaata Sankhya or Khasra numbers), and land area. It is issued by the UP Revenue Department. खतौनी क्या है? खतौनी एक सरकारी दस्तावेज़ है जिसमें किसी परिवार के नाम पर एक गाँव में पंजीकृत भूमि भूखंडों की सूची होती है। इसमें गाँव का नाम और कोड, मालिकों के नाम, भूखंड संख्याएं (गाटा संख्या) और भूमि क्षेत्र शामिल हैं।
1
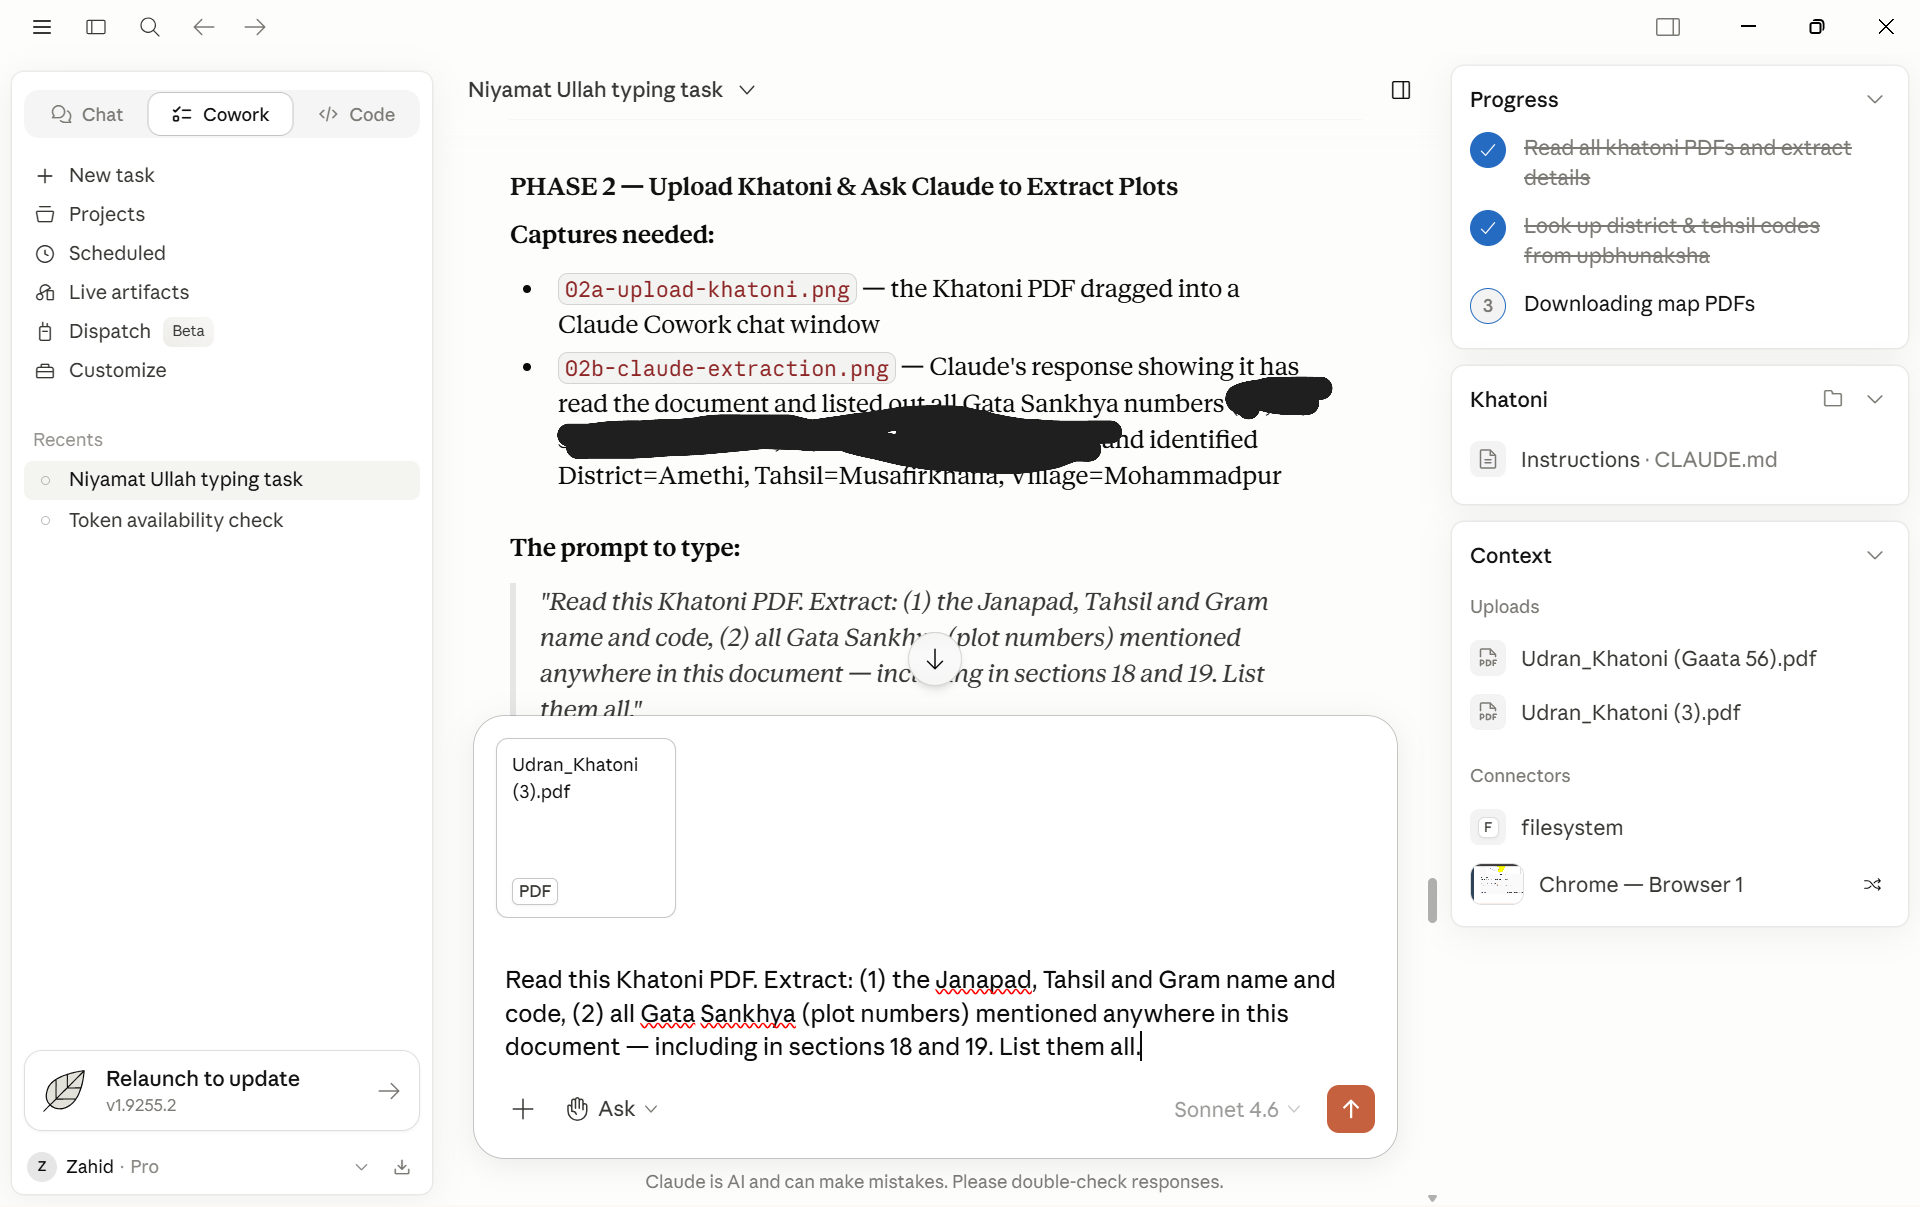
In Claude's chat window, drag and drop your Khatoni PDF, or click the paperclip icon to attach it. Claude के चैट विंडो में, अपनी खतौनी PDF को खींचकर छोड़ें, या पेपरक्लिप आइकन पर क्लिक करके अटैच करें।
2
Once the file is attached, type and send this exact prompt: फ़ाइल अटैच होने के बाद, यह प्रॉम्प्ट टाइप करके भेजें:
Copy this promptयह प्रॉम्प्ट कॉपी करें "Read this Khatoni PDF. Extract: (1) the Janapad, Tahsil and Gram name and code, (2) all Gata Sankhya (plot numbers) mentioned anywhere in this document — including in sections 18 and 19. List them all." "इस खतौनी PDF को पढ़ें। निकालें: (1) जनपद, तहसील और ग्राम का नाम और कोड, (2) इस दस्तावेज़ में कहीं भी उल्लिखित सभी गाटा संख्याएं — धाराएं 18 और 19 सहित। सभी की सूची बनाएं।"
3
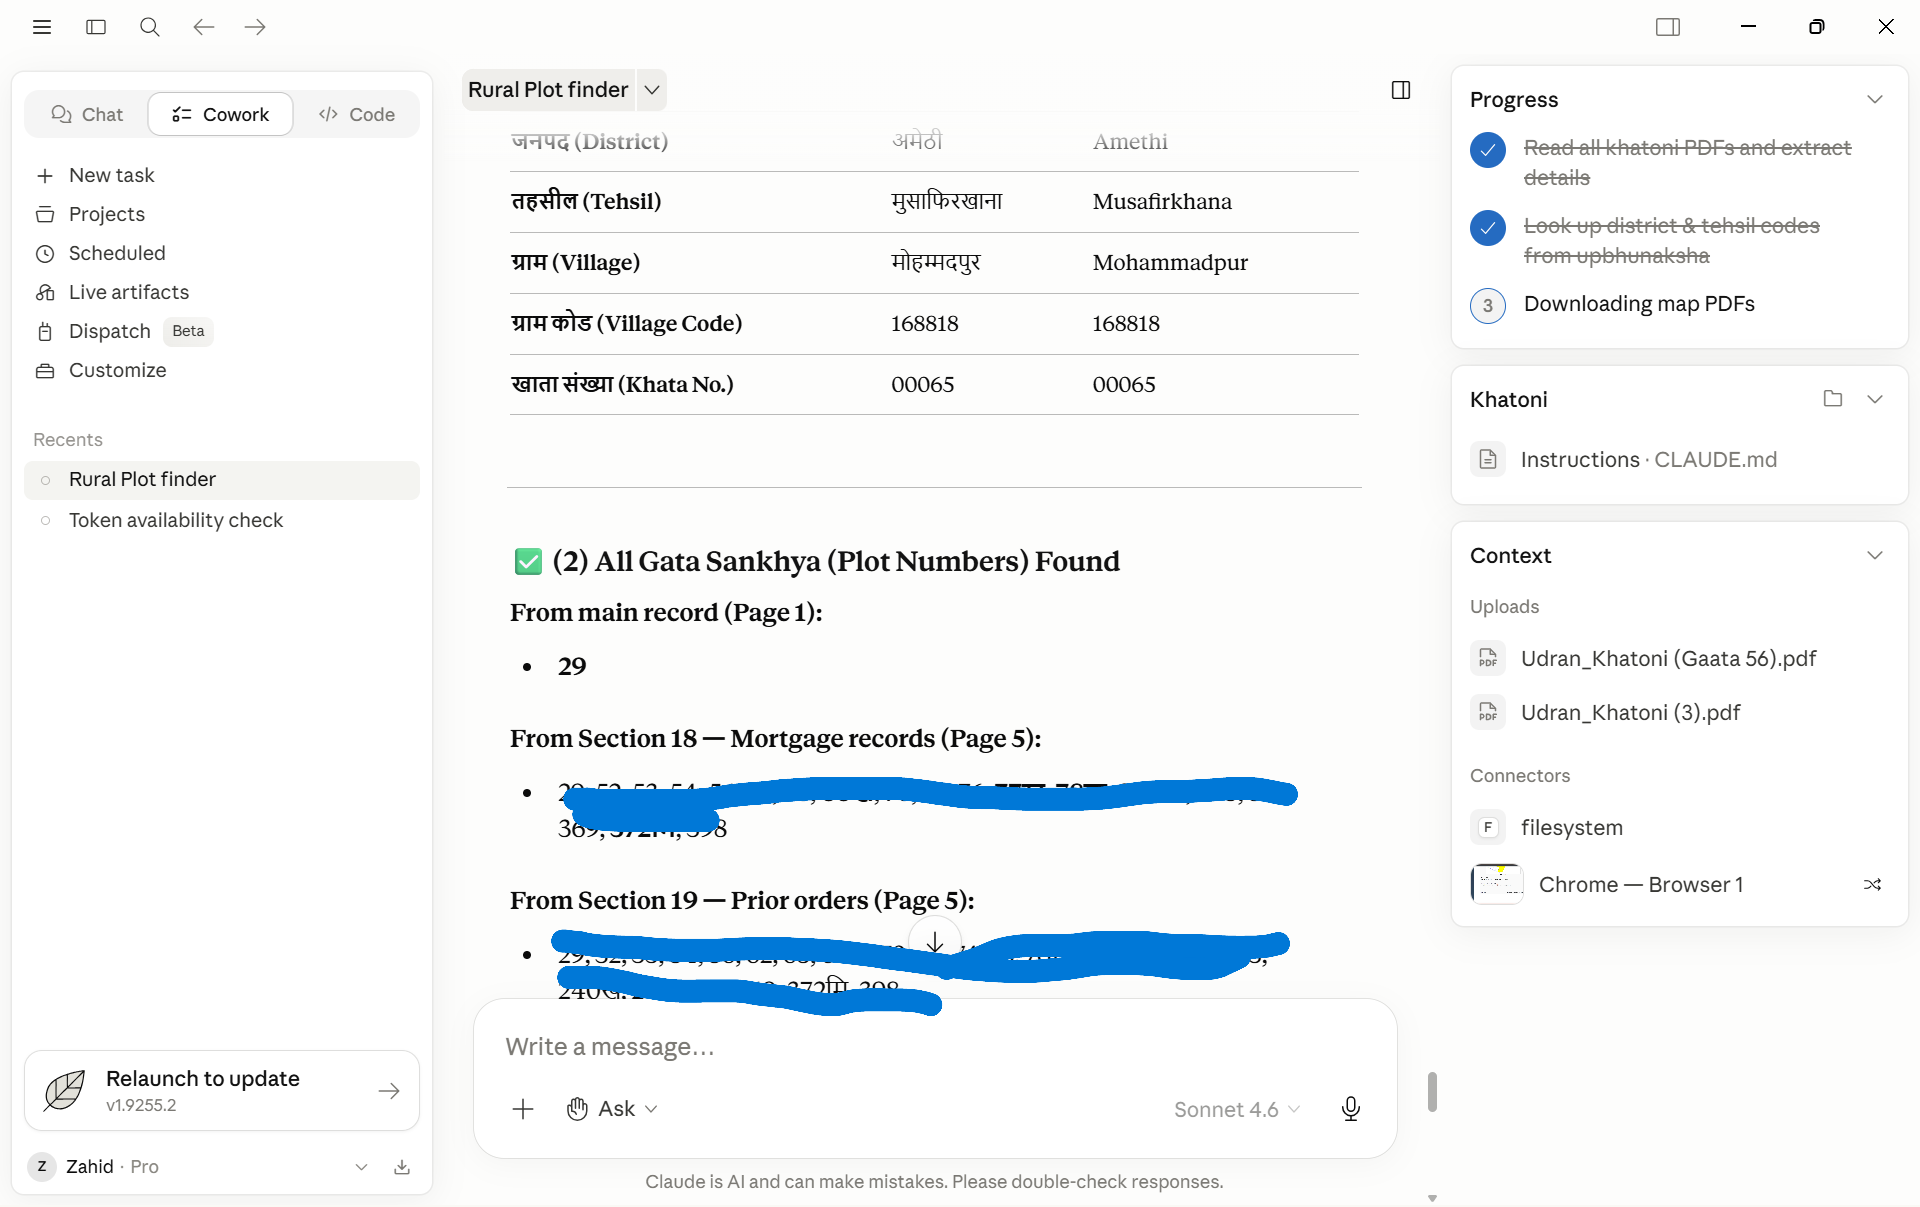
Claude will respond with a structured list. Write down or save: the District (Janapad), Tehsil, Village name, Village code, and — most importantly — the complete list of all Gaata numbers. You will need all of these in the steps ahead. Claude एक सूची के साथ जवाब देगा। नोट करें या सेव करें: जिला, तहसील, ग्राम का नाम, ग्राम कोड, और सभी गाटा संख्याएं।
Uploading Khatoni to Claude
The Khatoni PDF attached to Claude with the extraction promptClaude में खतौनी PDF अटैच और प्रॉम्प्ट तैयार
Claude extraction result
Claude's response — district, tehsil, village code, and all gaata numbers extractedClaude का जवाब — जिला, तहसील, ग्राम कोड और सभी गाटा संख्याएं
💡 What is a Gaata number?💡 गाटा संख्या क्या है?
Also called Khasra number, it is the unique ID assigned to each individual plot of land in a village. A family typically owns multiple gaatas. You'll use these numbers throughout the rest of this guide. इसे खसरा नंबर भी कहते हैं। यह गाँव के प्रत्येक भूखंड को दिया गया अद्वितीय नंबर है। एक परिवार के पास आमतौर पर कई गाटे होते हैं।
3
Find All Plots on UP Bhulekh UP Bhulekh पर सभी भूखंड खोजें

The UP Bhulekh portal is the official government website for viewing land records (Khatoni) online. You'll use it to confirm all plots associated with your family's name in the village. UP Bhulekh पोर्टल खतौनी ऑनलाइन देखने की सरकारी वेबसाइट है। आप इसका उपयोग गाँव में अपने परिवार से जुड़े सभी भूखंडों की पुष्टि करने के लिए करेंगे।
1
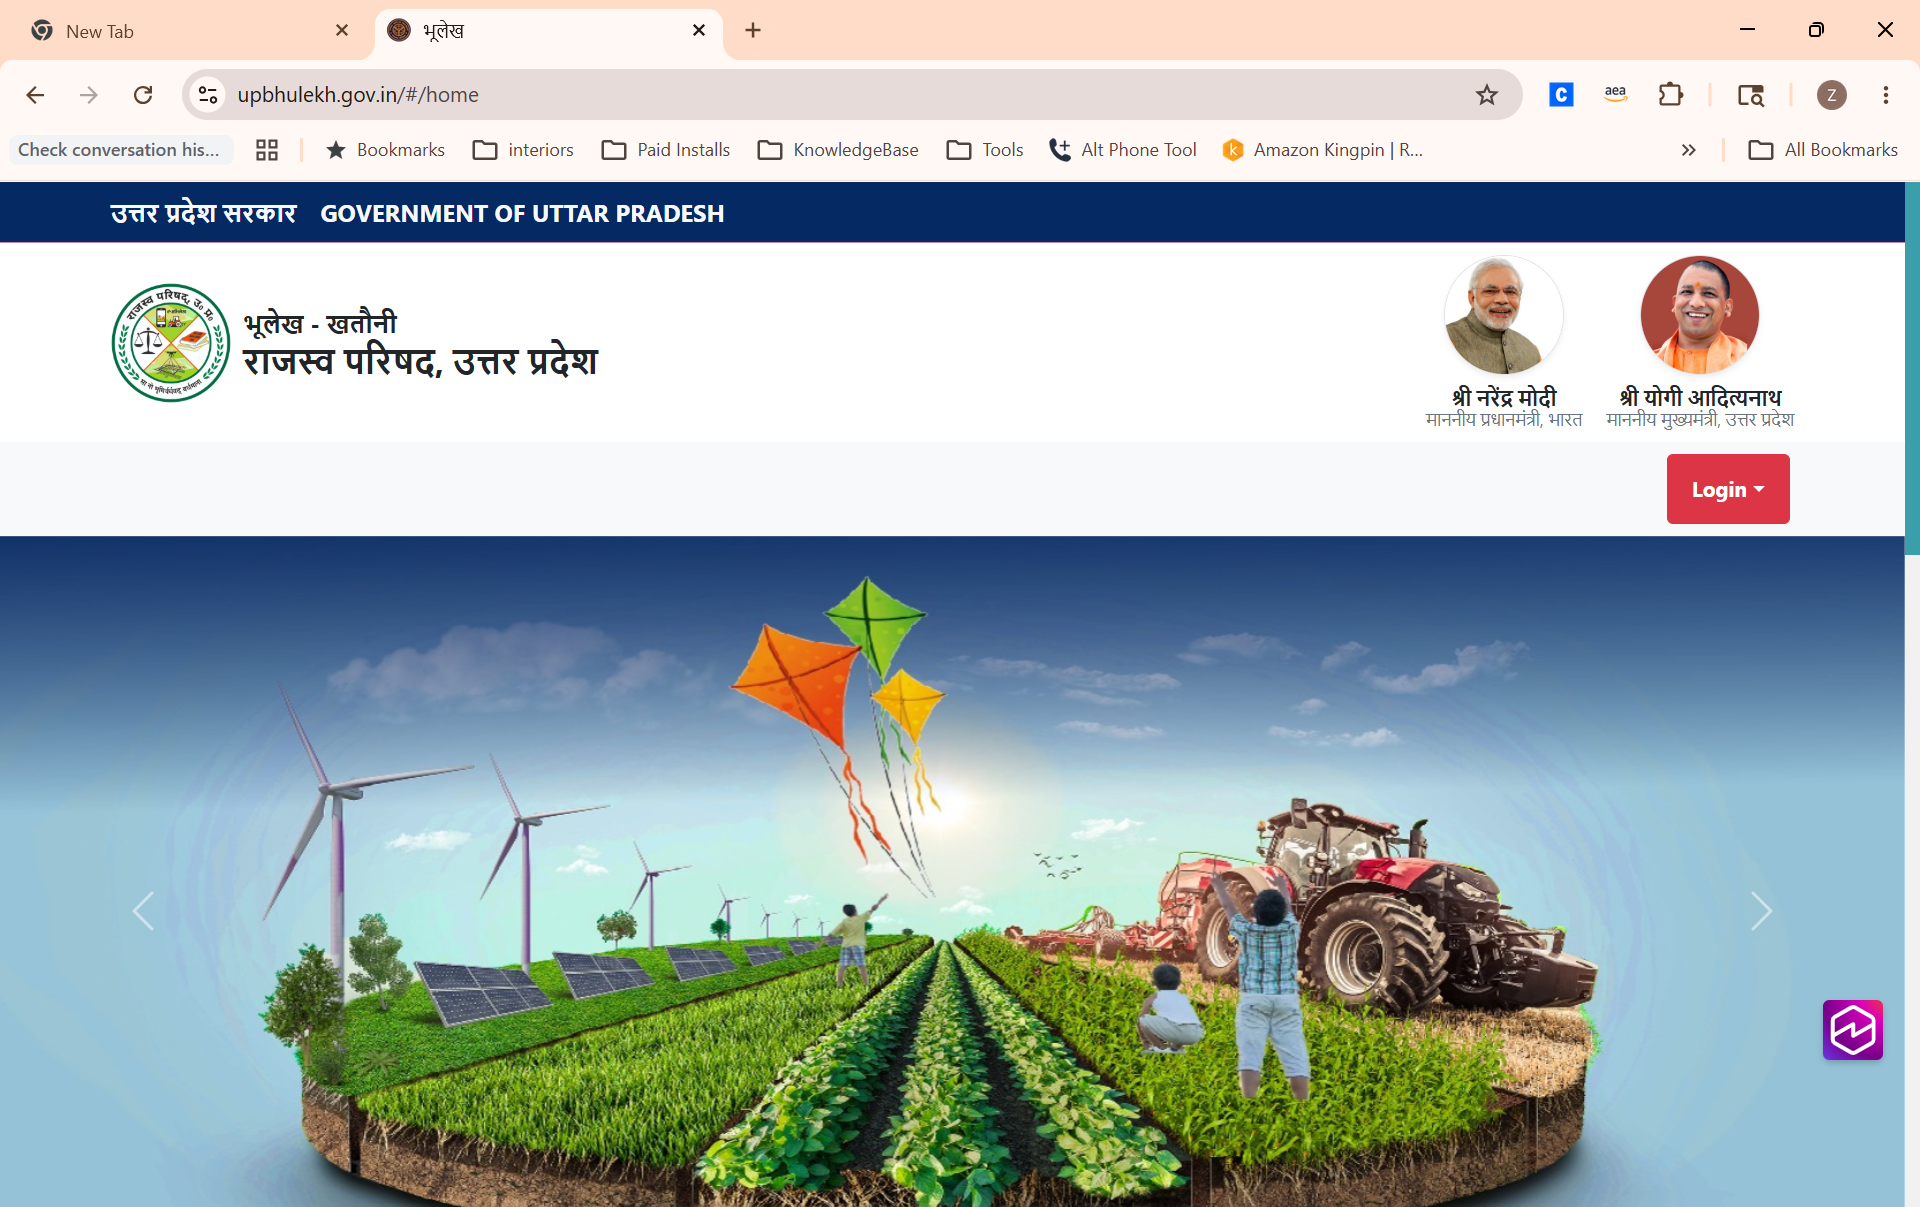
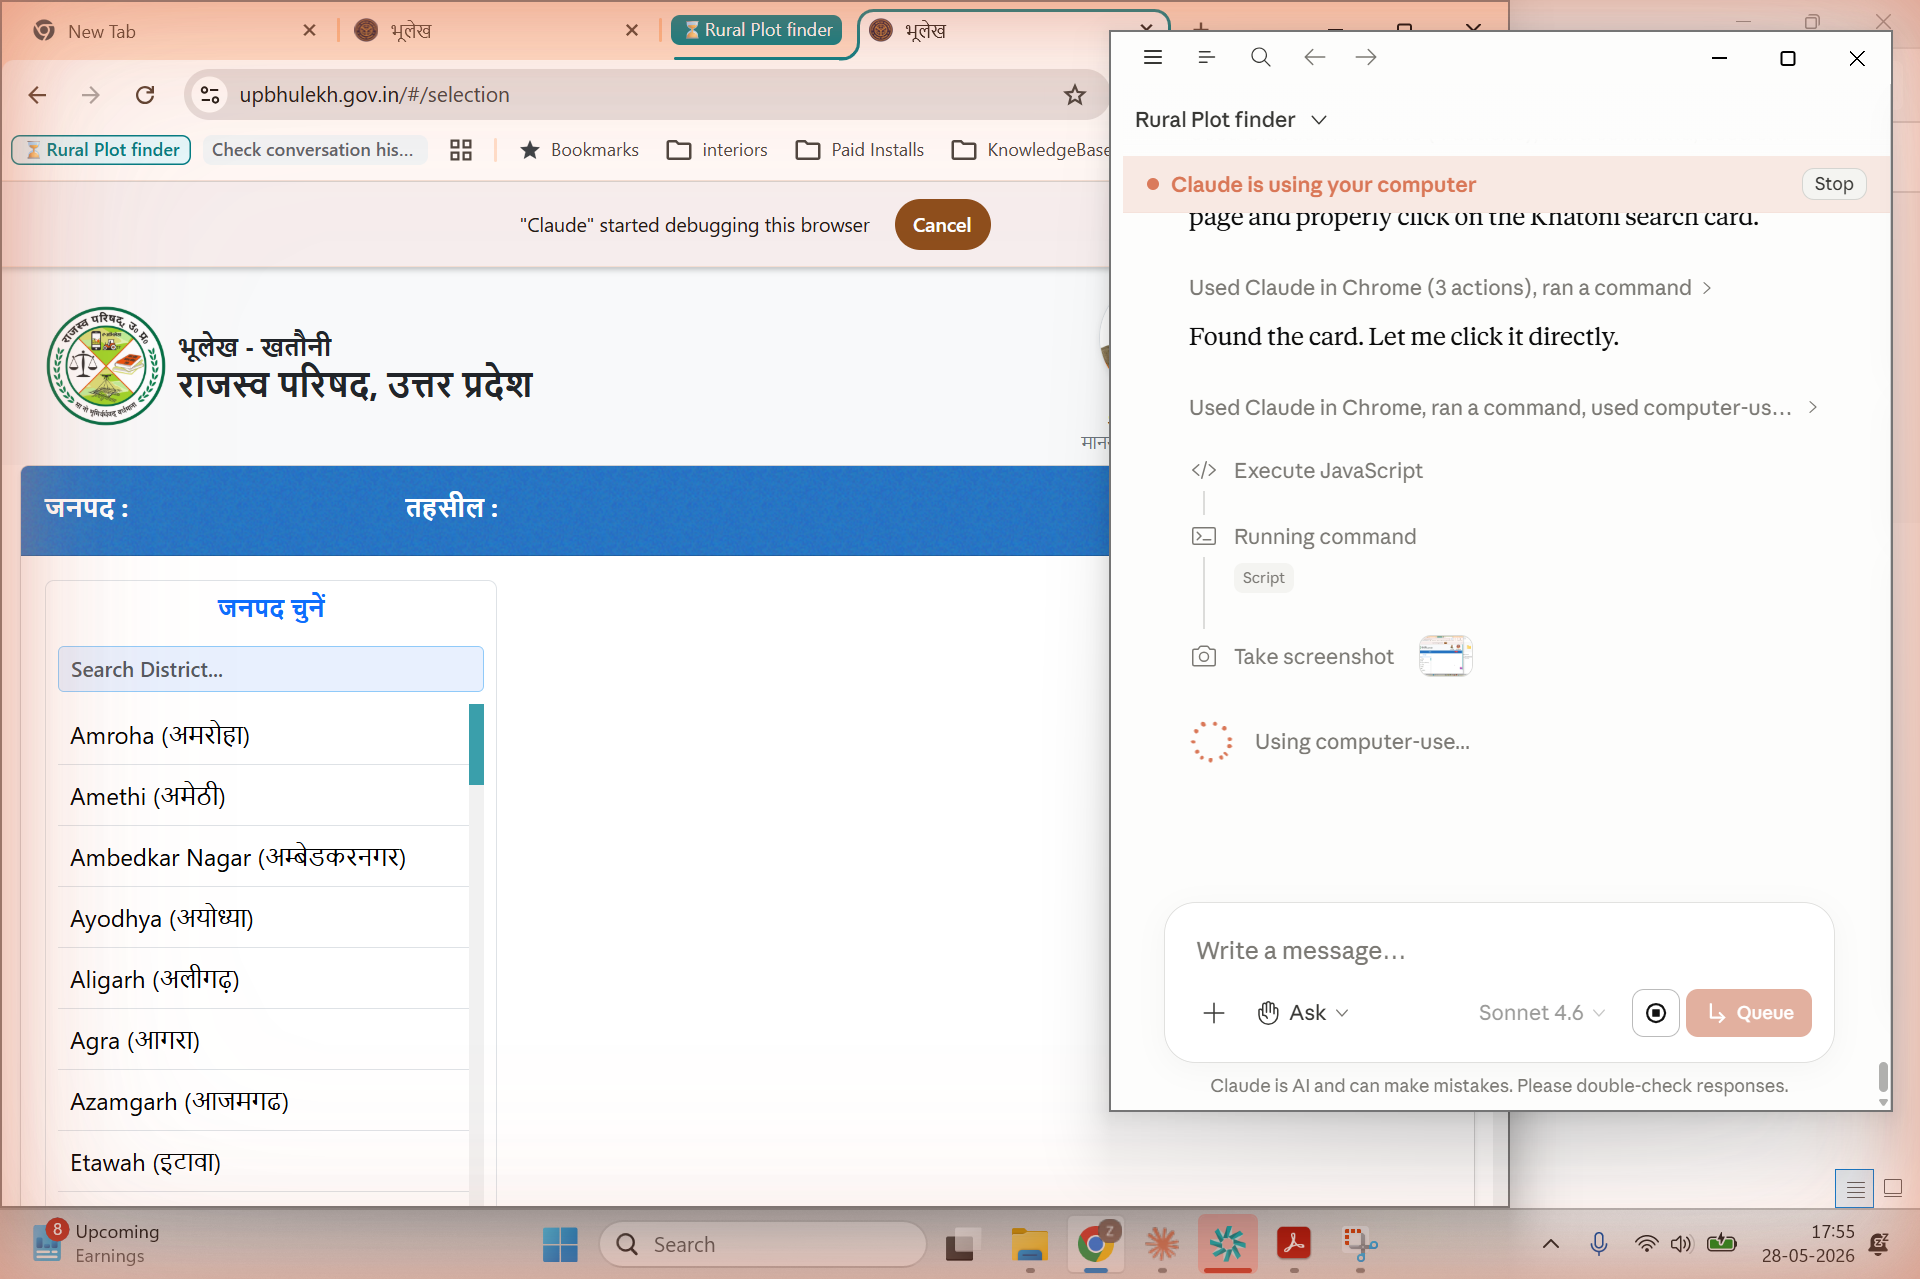
Go to upbhulekh.gov.in in Chrome. Chrome में upbhulekh.gov.in खोलें।
2
Click on "खतौनी (अधिकार अभिलेख) की नकल देखें" (View Khatoni copy). "खतौनी (अधिकार अभिलेख) की नकल देखें" पर क्लिक करें।
3
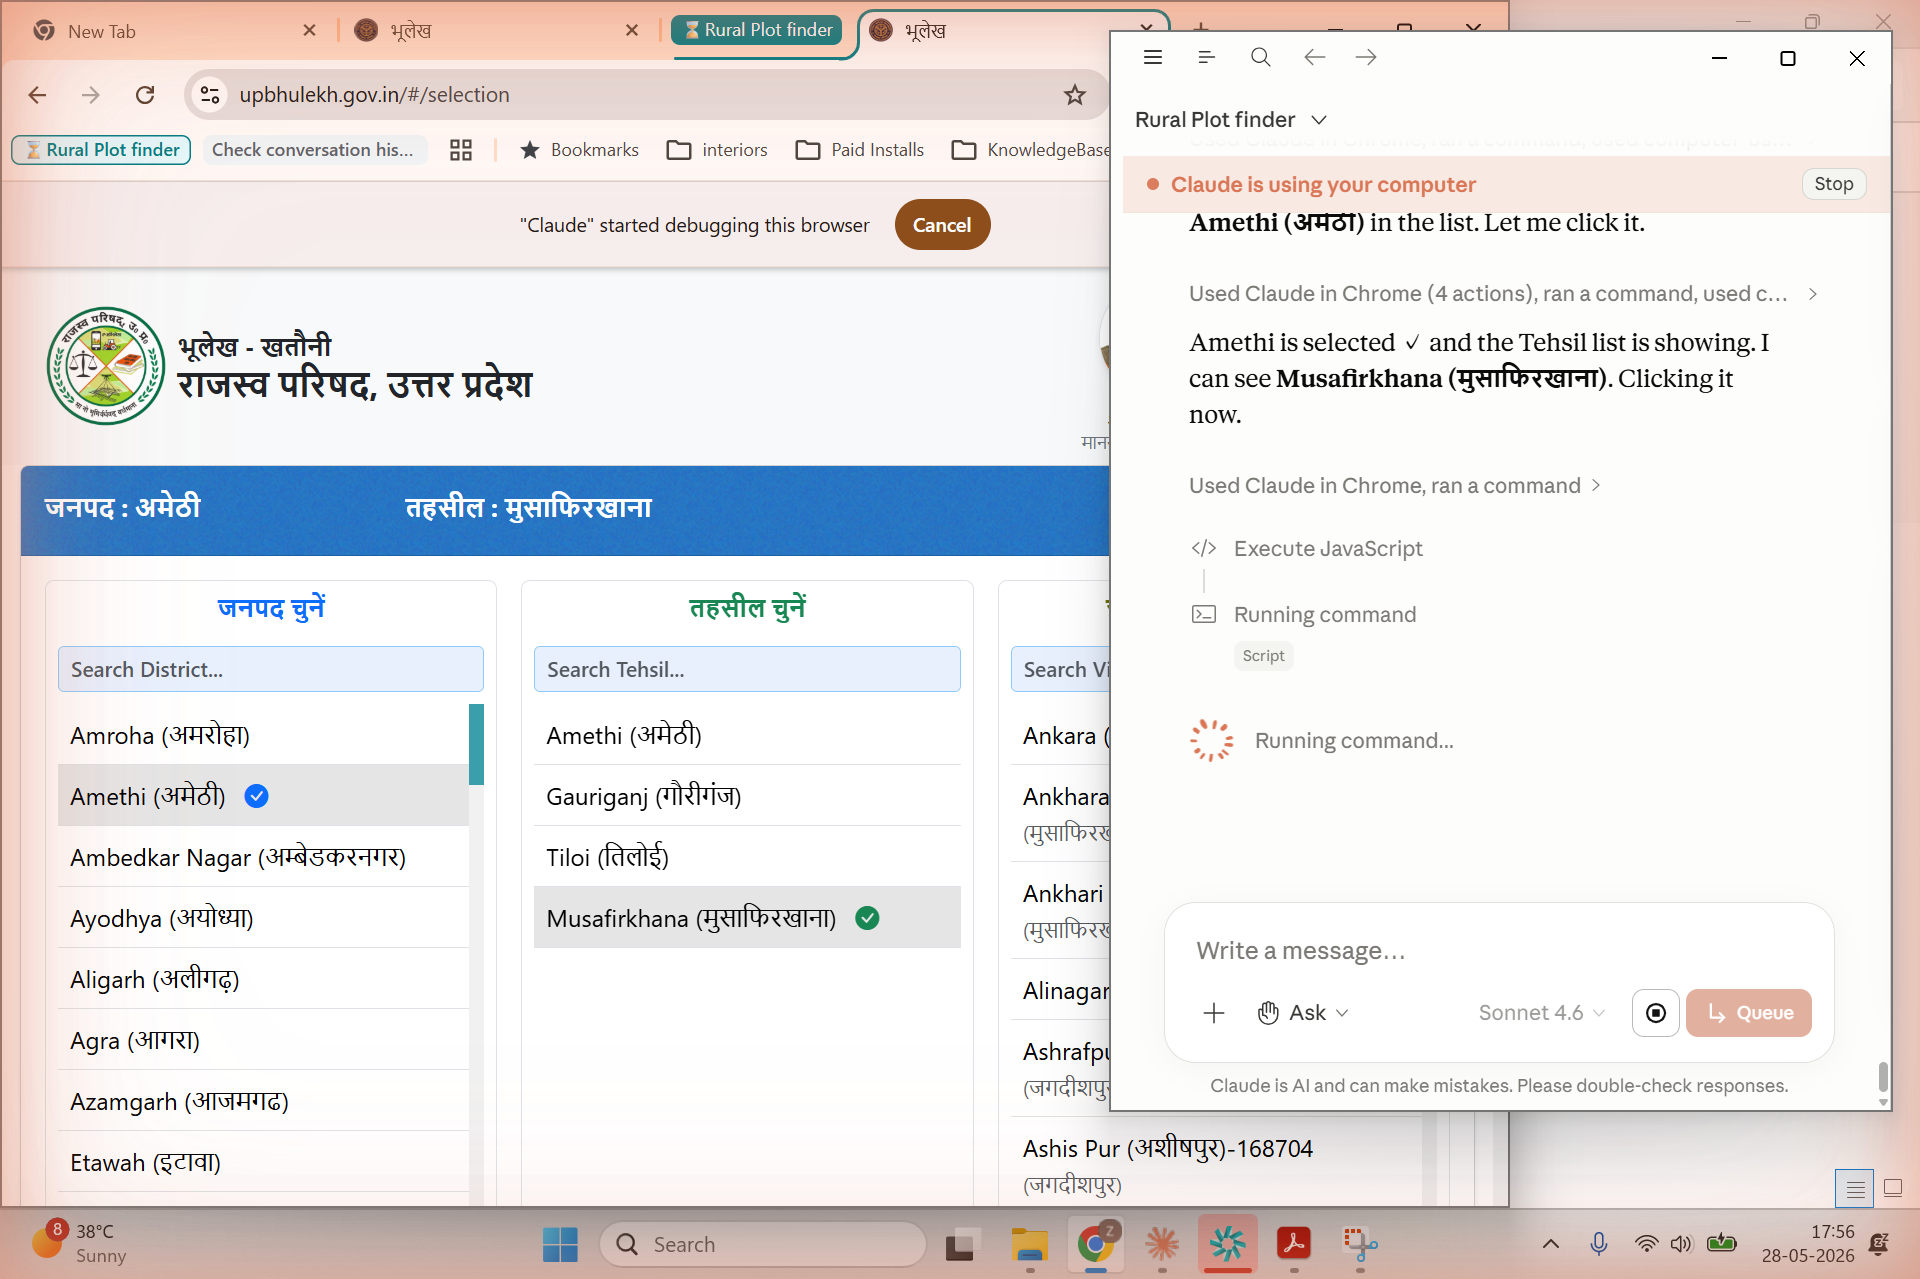
A captcha will appear — complete it, then select your District from the dropdown. Then select your Tehsil, then your Village. कैप्चा पूरा करें, फिर dropdown से अपना जिला, तहसील और ग्राम चुनें।
4
On the next screen, select "खातेदार के नाम द्वारा खोजें" (Search by owner name). अगली स्क्रीन पर "खातेदार के नाम द्वारा खोजें" चुनें।
5
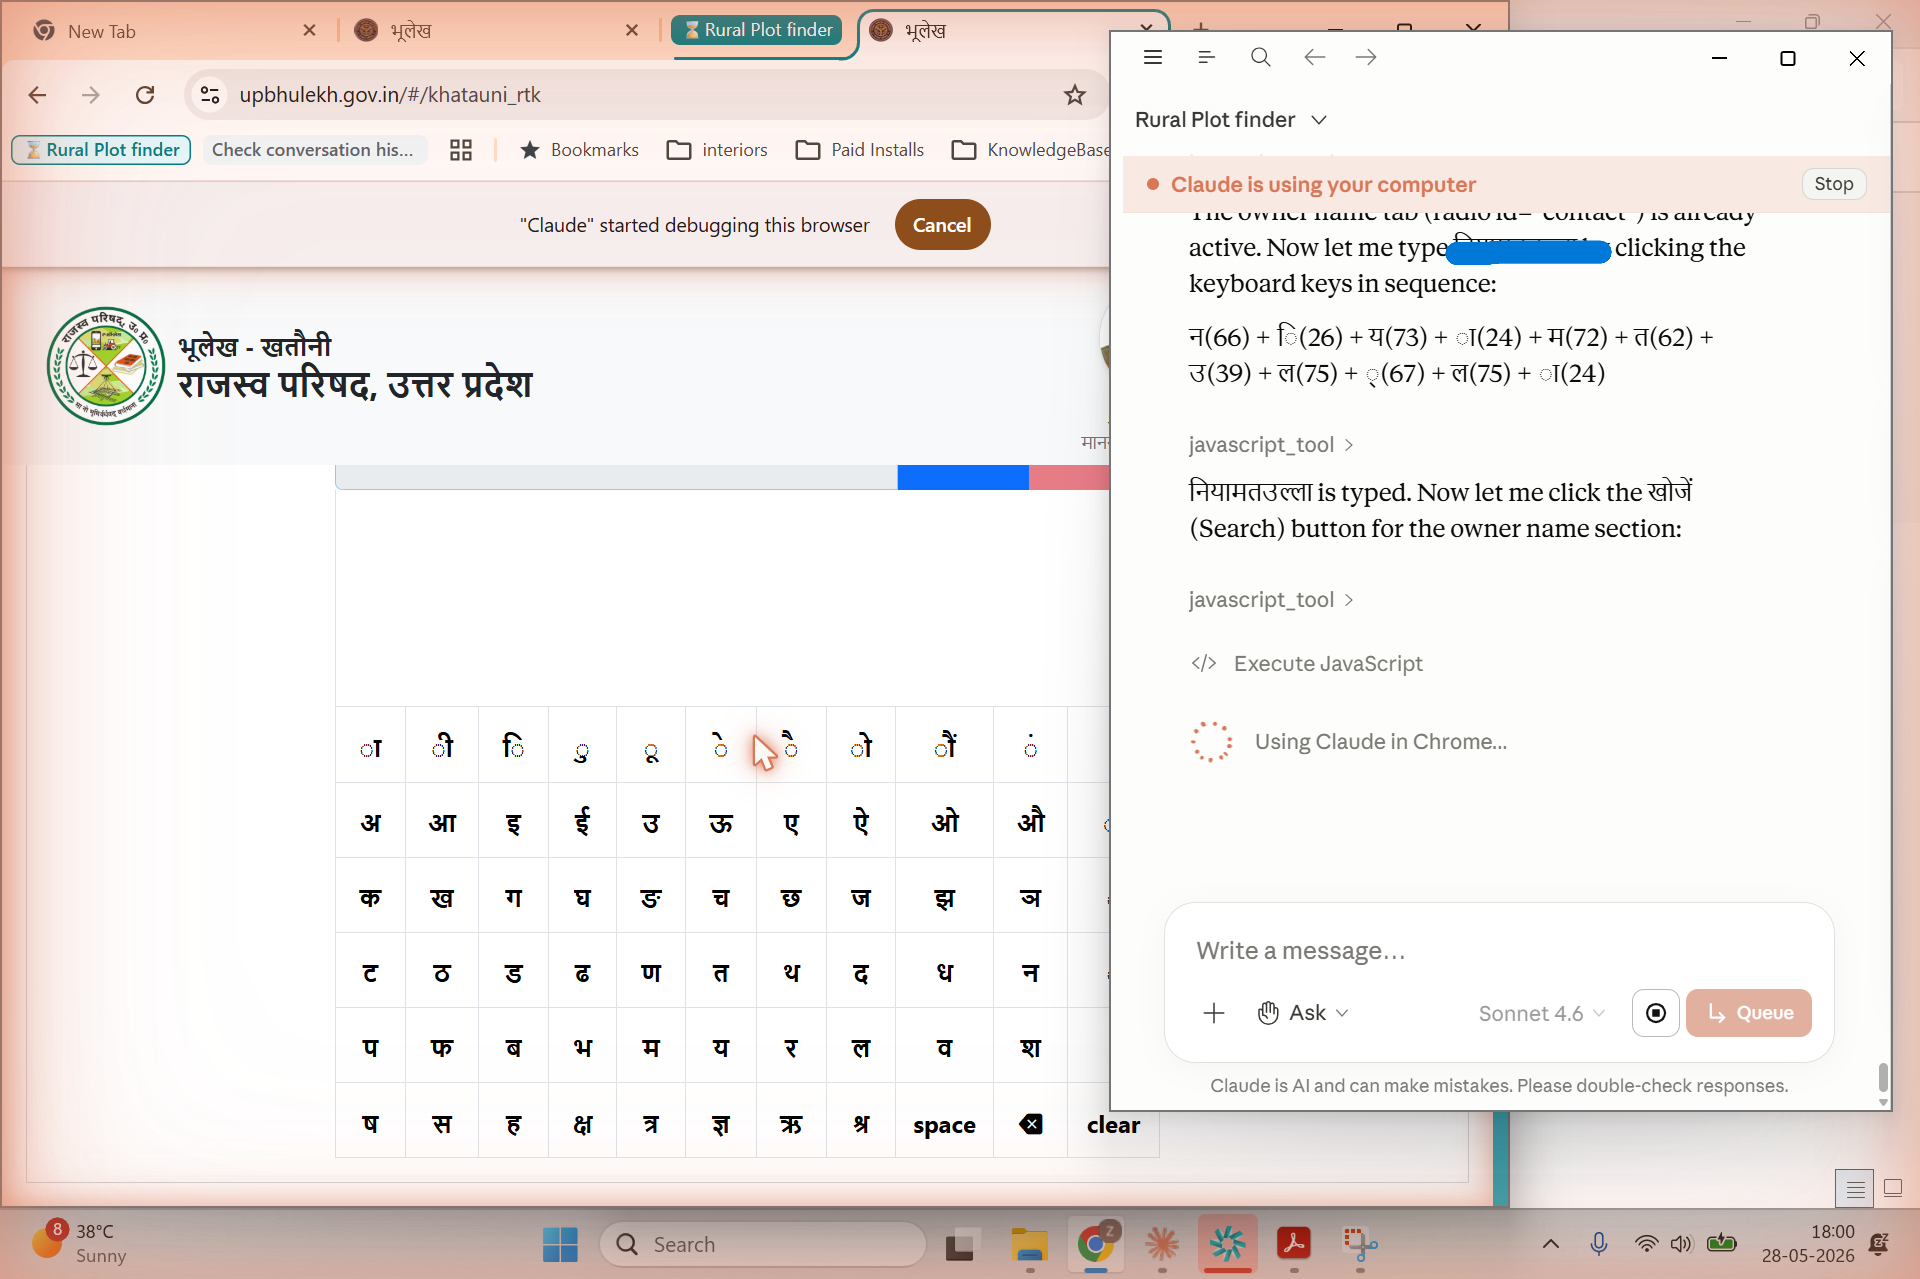
An on-screen Devanagari (Hindi) keyboard will appear. Click the letters one by one to spell out the landowner's name in Hindi. If you're unsure of the exact spelling, try the most common variant — or search by Khata number instead. एक देवनागरी ऑन-स्क्रीन कीबोर्ड दिखेगा। अक्षर एक-एक करके क्लिक करके भूस्वामी का नाम हिंदी में लिखें।
6
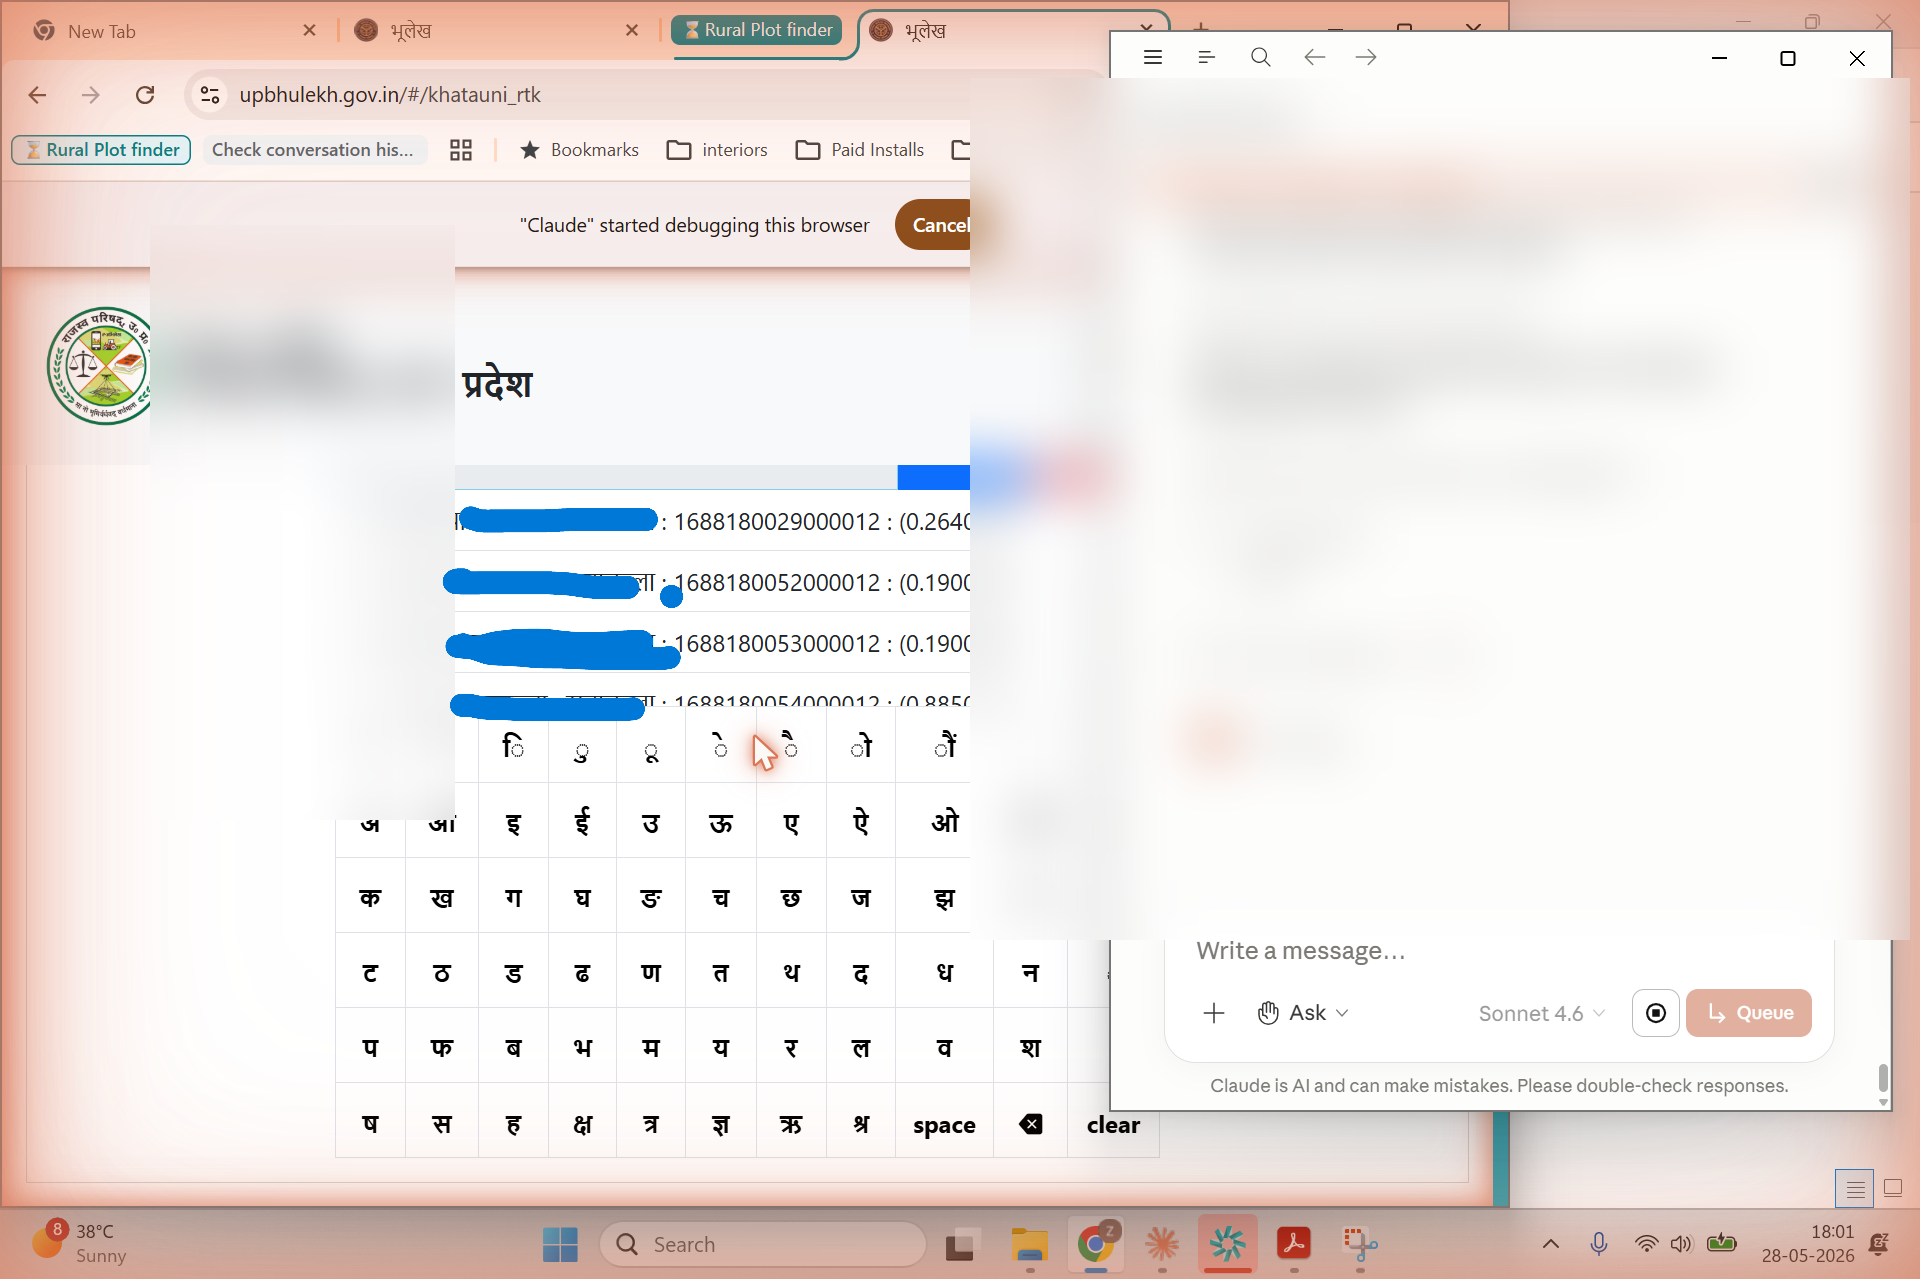
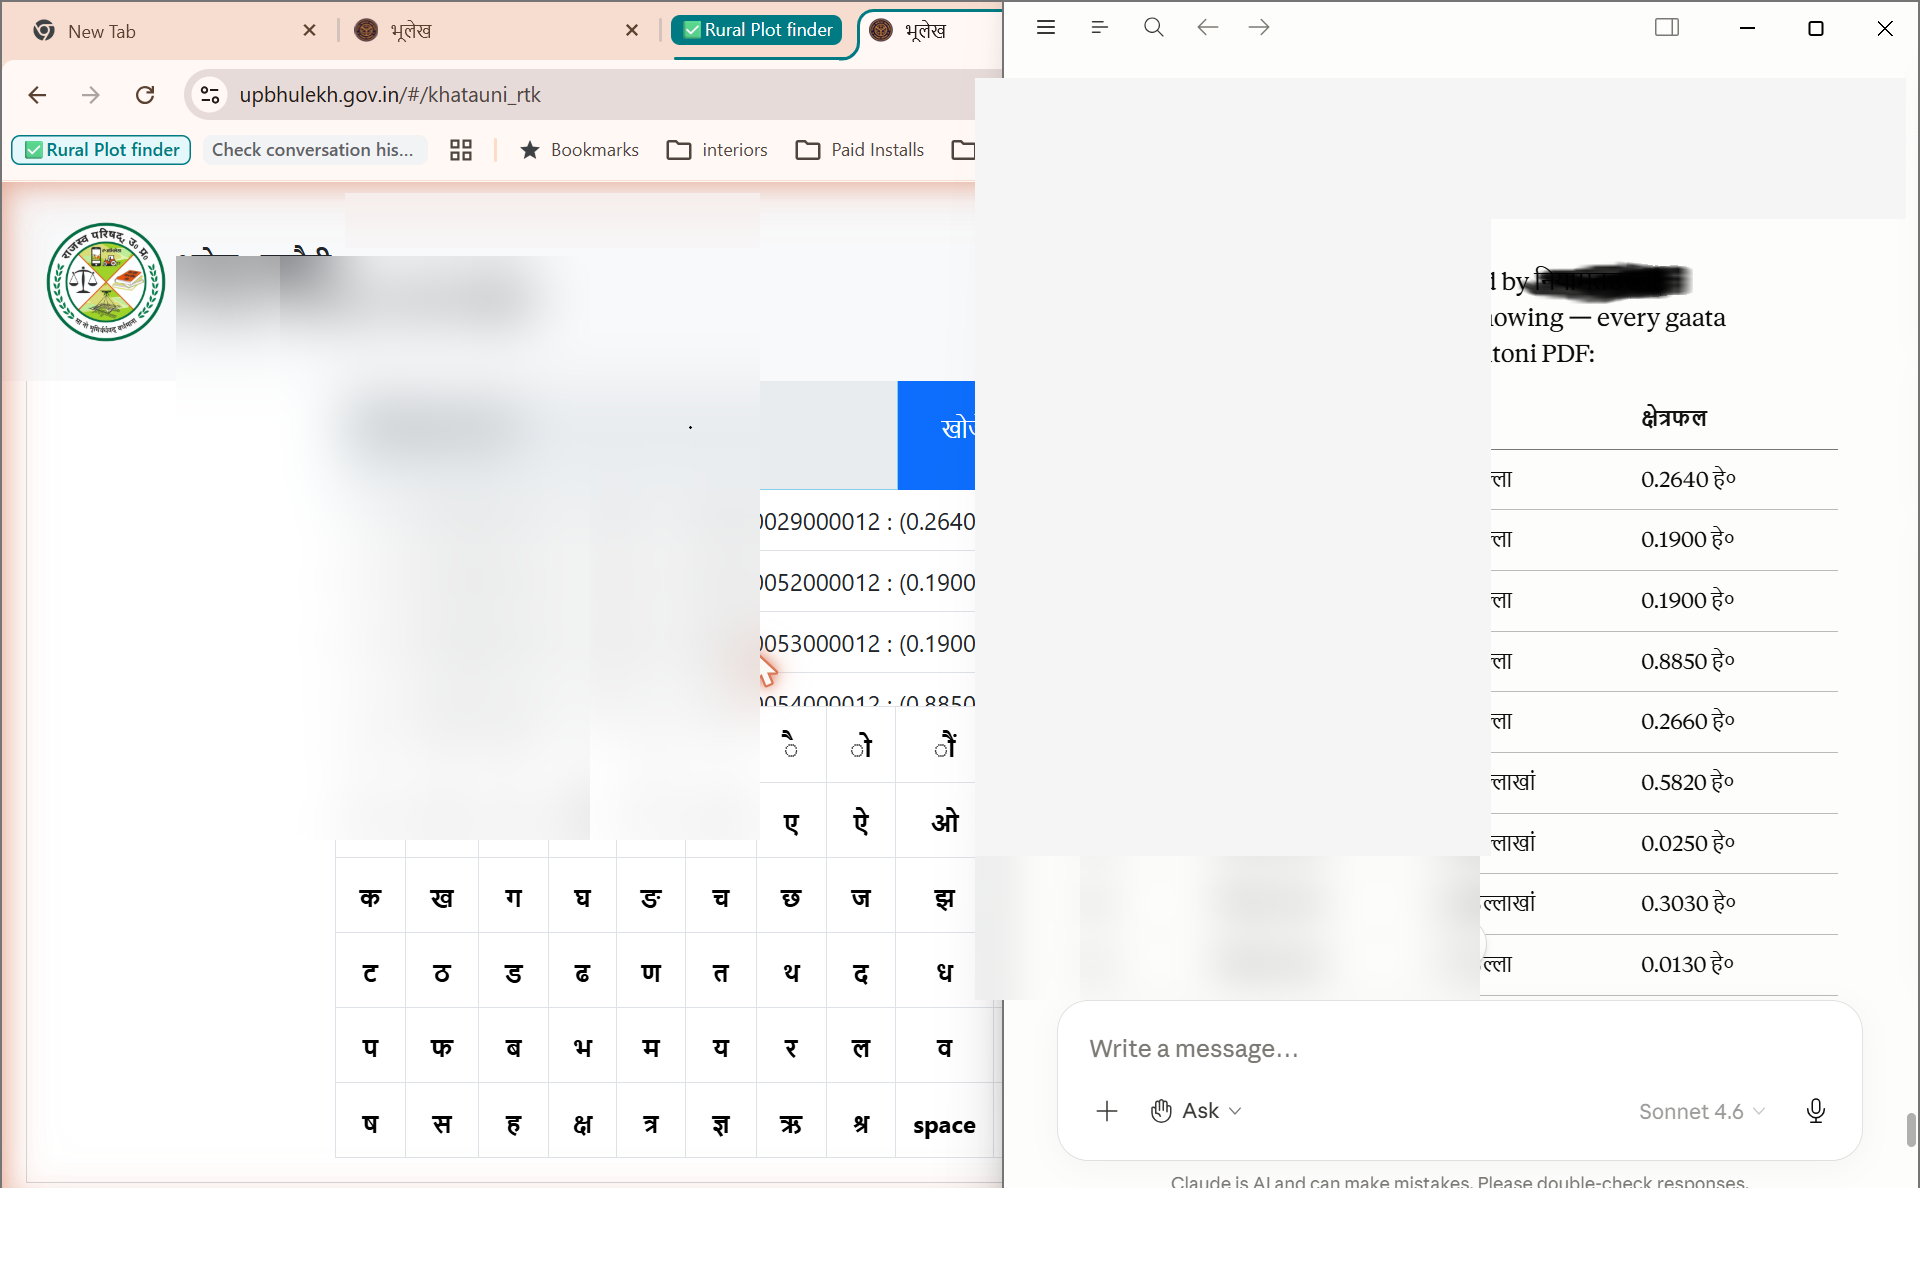
Click खोजें (Search) — all matching Khata records will appear as a list. Click any result to open the full Khatoni and view the plot numbers and owner details. खोजें पर क्लिक करें — सभी मिलते-जुलते खाता रिकॉर्ड दिखेंगे। पूरी खतौनी देखने के लिए किसी भी परिणाम पर क्लिक करें।
UP Bhulekh homepage
UP Bhulekh homepage — the official UP land records portalUP Bhulekh होमपेज — आधिकारिक भूलेख पोर्टल
Selecting district
District dropdown open — select your Janapadजिला dropdown — अपना जनपद चुनें
District and tehsil selected
District and Tehsil both selectedजिला और तहसील दोनों चुने गए
Devanagari keyboard typing
Typing the owner's name using the on-screen Devanagari keyboardऑन-स्क्रीन देवनागरी कीबोर्ड से मालिक का नाम टाइप करना
Keyboard with results appearing
Name typed — results beginning to appear on the leftनाम टाइप — बाईं ओर परिणाम दिखने लगे
All search results
All matching plots listed with their Gaata numbers and areaसभी मिलते-जुलते भूखंड गाटा संख्या और क्षेत्रफल सहित सूचीबद्ध
Khatoni detail view
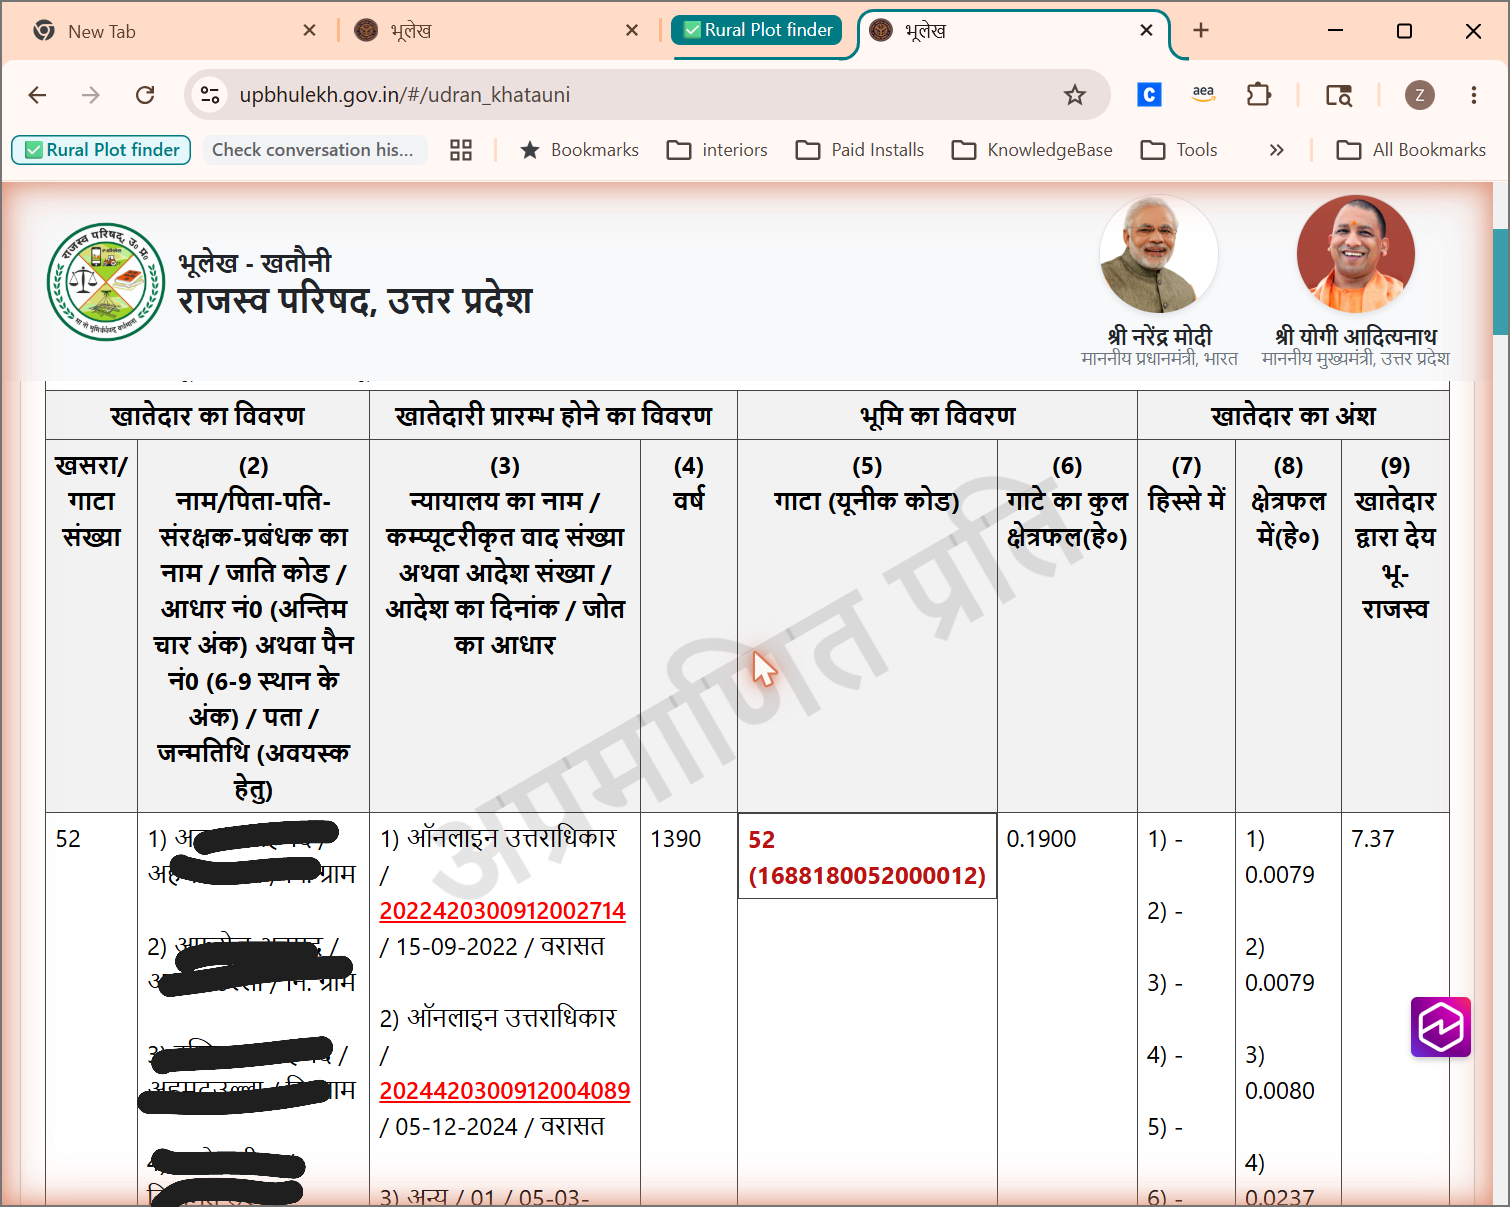
Full Khatoni detail — plot number, area, and all co-owners listedपूर्ण खतौनी विवरण — भूखंड संख्या, क्षेत्र और सभी सह-स्वामी
💡 Tip💡 सुझाव
If searching by name returns no results, try alternate spellings or a different family member's name. Land records sometimes use older or variant spellings of names. You can also search by Khata number if you have it from your Khatoni document. यदि नाम से खोज में कोई परिणाम नहीं मिलता, तो वैकल्पिक वर्तनी या किसी अन्य परिवार के सदस्य का नाम आज़माएं। आप खाता संख्या से भी खोज सकते हैं।
4
View & Download Official Plot Maps from BhuNaksha BhuNaksha से आधिकारिक भूखंड मानचित्र देखें और डाउनलोड करें

BhuNaksha is the UP government's cadastral map portal. It shows the exact drawn boundary of every plot in every village. Here you can see which physical shape on the map corresponds to each Gaata number, and download an official PDF map for each one. BhuNaksha उत्तर प्रदेश सरकार का भूकर मानचित्र पोर्टल है। यह प्रत्येक गाँव के हर भूखंड की सटीक सीमा दिखाता है।

1
Go to upbhunaksha.gov.in. upbhunaksha.gov.in पर जाएं।
2
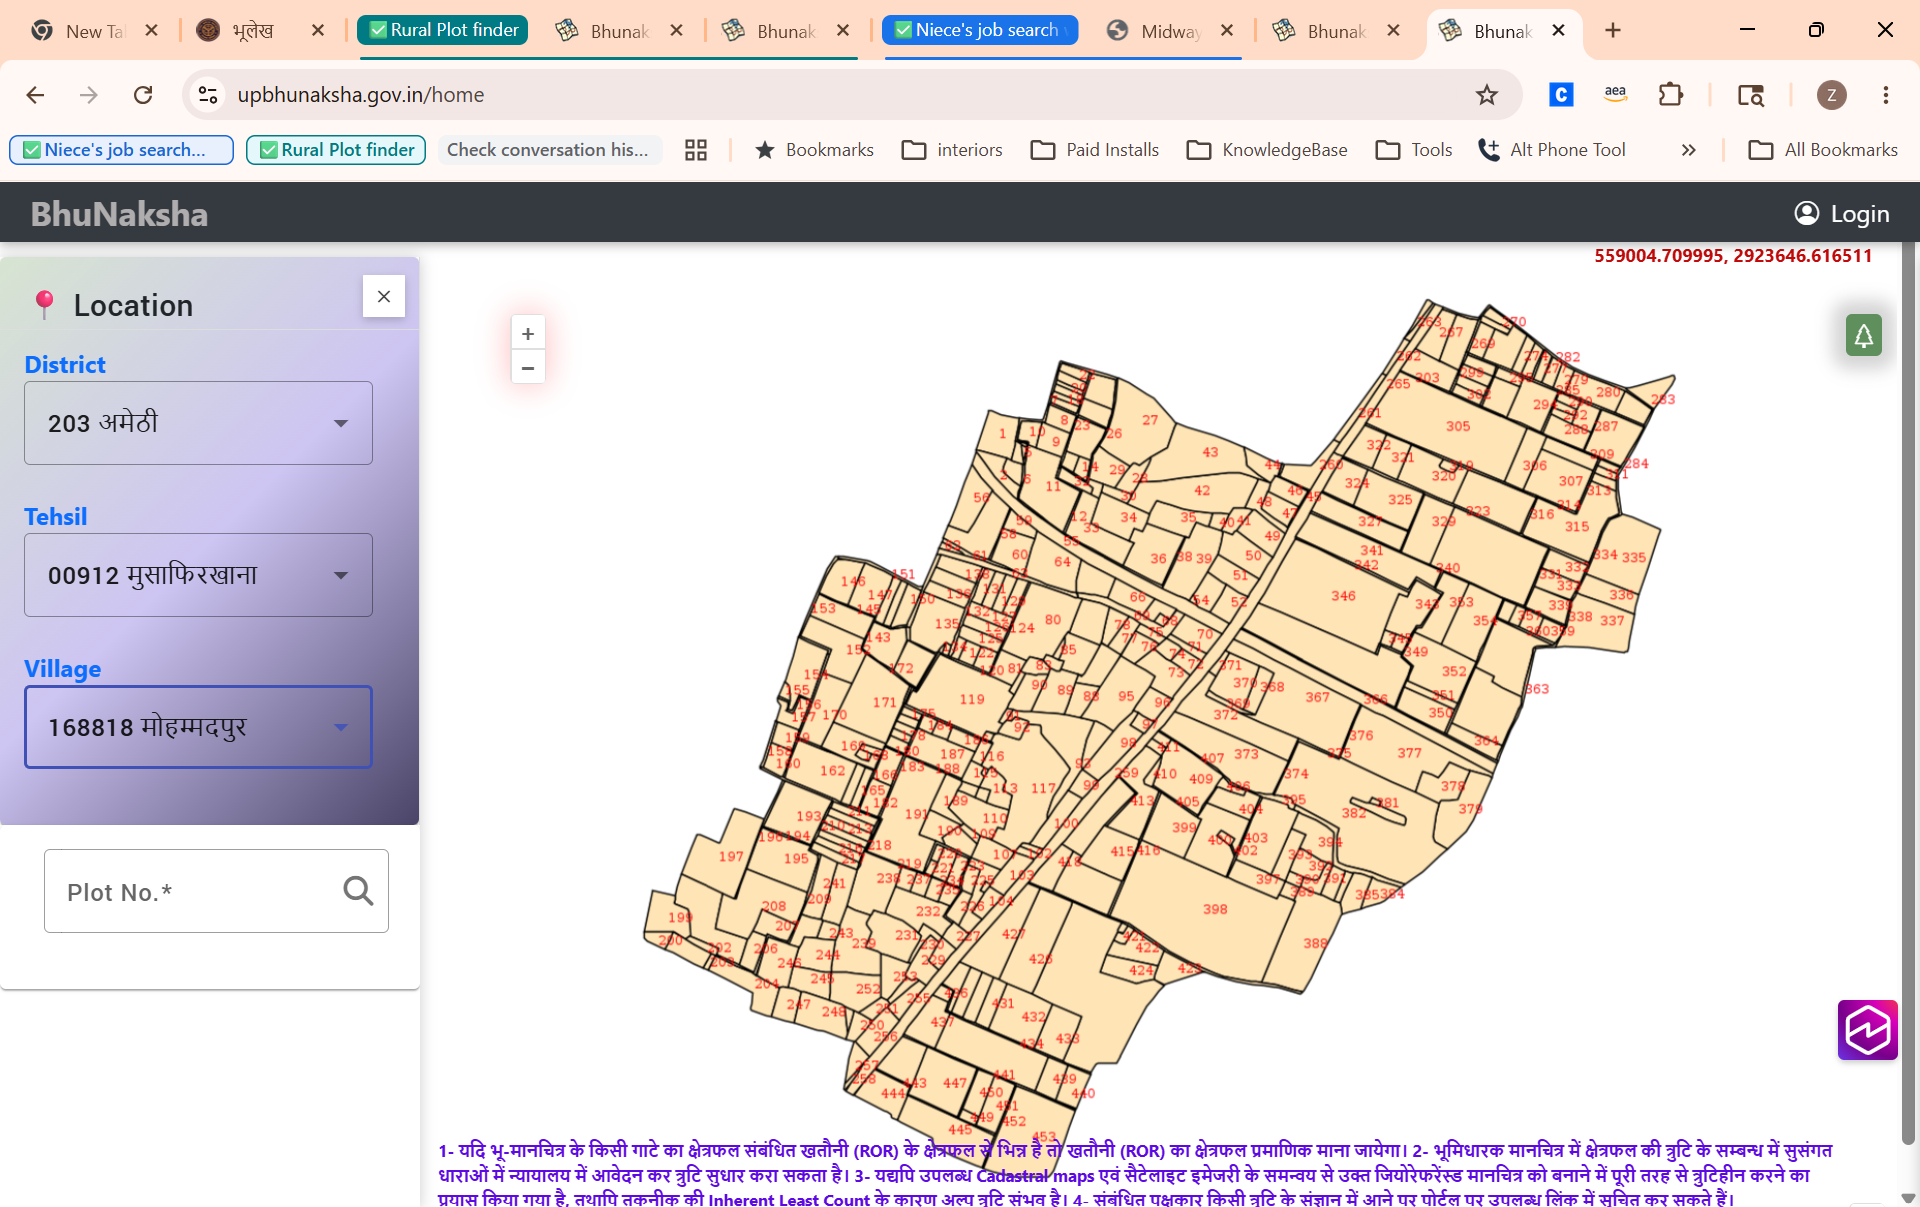
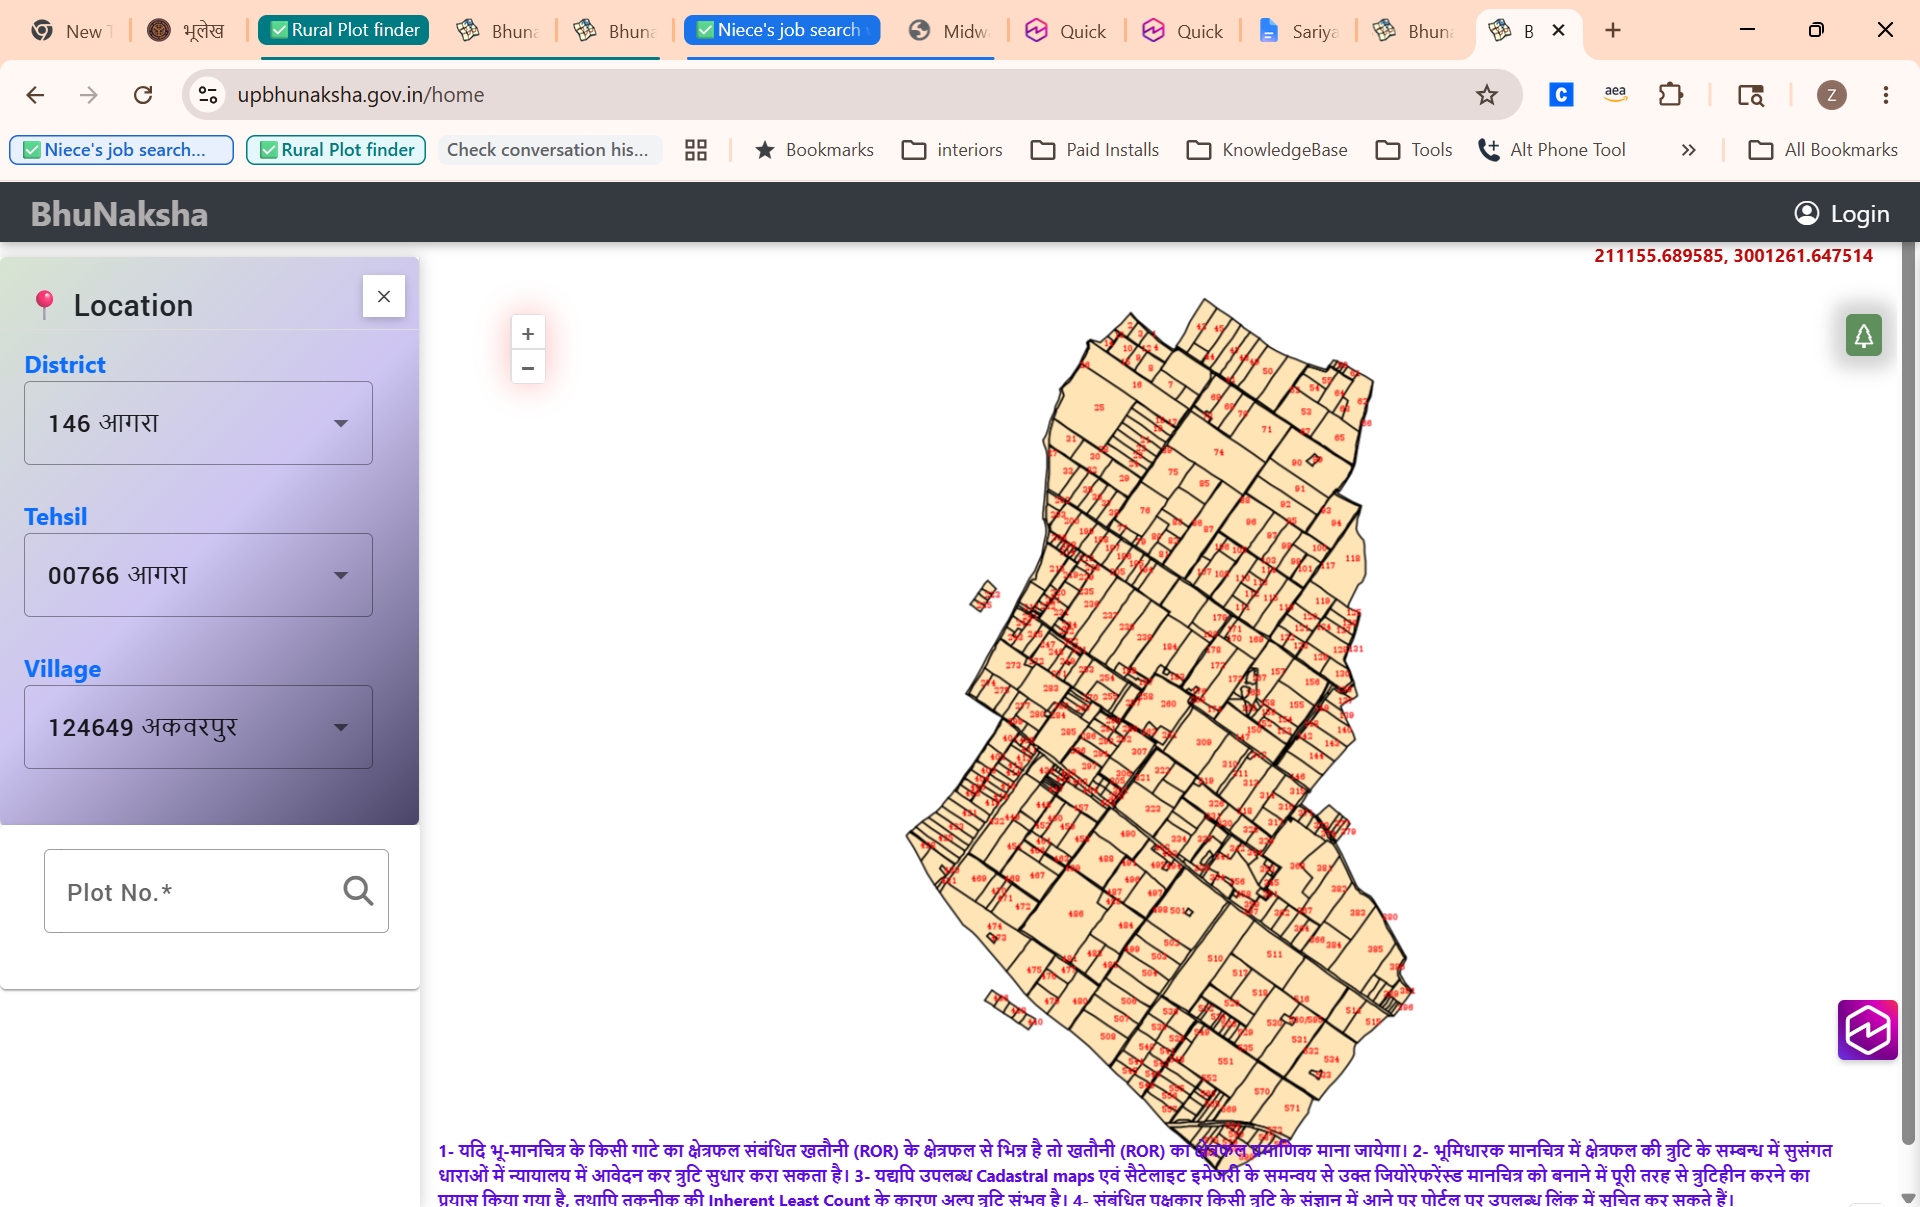
On the left panel, select your District, then Tehsil, then Village from the dropdowns. The village cadastral map will load — you'll see all plots drawn as numbered shapes. बाईं पैनल में dropdown से अपना जिला, तहसील और ग्राम चुनें। गाँव का भूकर मानचित्र लोड होगा।
3
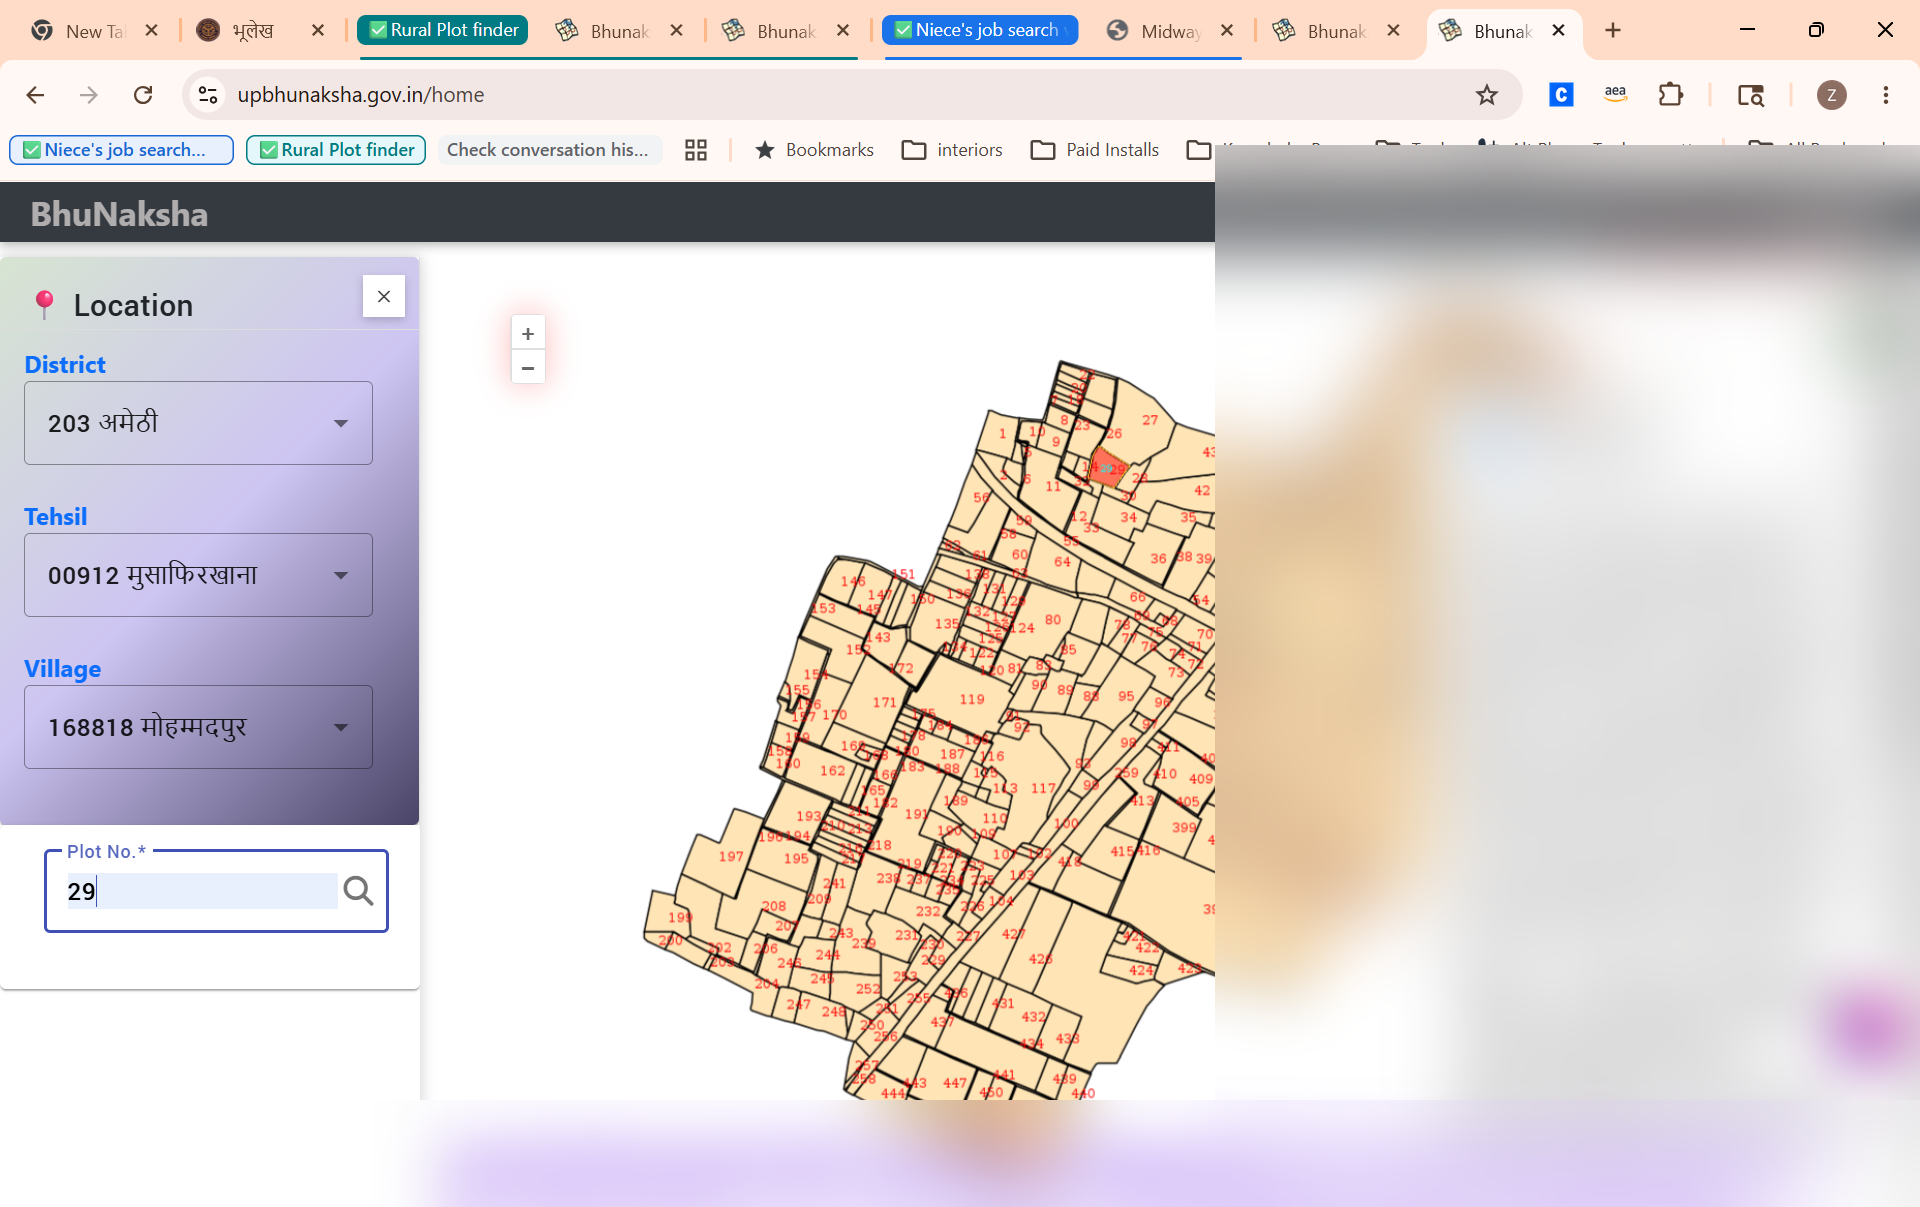
Type a Gaata number in the Plot No. field and press the search icon — the map will zoom to that plot and highlight it. Plot No. फ़ील्ड में गाटा संख्या टाइप करें और खोज आइकन दबाएं — मानचित्र उस भूखंड पर ज़ूम करेगा।
4
A Plot Info panel will appear on the right showing the Khata number, area, and all co-owners for that plot. दाईं ओर Plot Info पैनल में खाता संख्या, क्षेत्रफल और सभी सह-स्वामी दिखेंगे।
5
To download the official plot map PDF, navigate directly to this URL in your browser — replacing [GISCODE] with your village's gisCode (from Step 2) and [GAATA] with the plot number:
https://upbhunaksha.gov.in/plotreport/[GISCODE]/[GAATA]
आधिकारिक PDF डाउनलोड करने के लिए, ब्राउज़र में यह URL डालें — [GISCODE] को अपने गाँव के gisCode से और [GAATA] को भूखंड संख्या से बदलें।
6
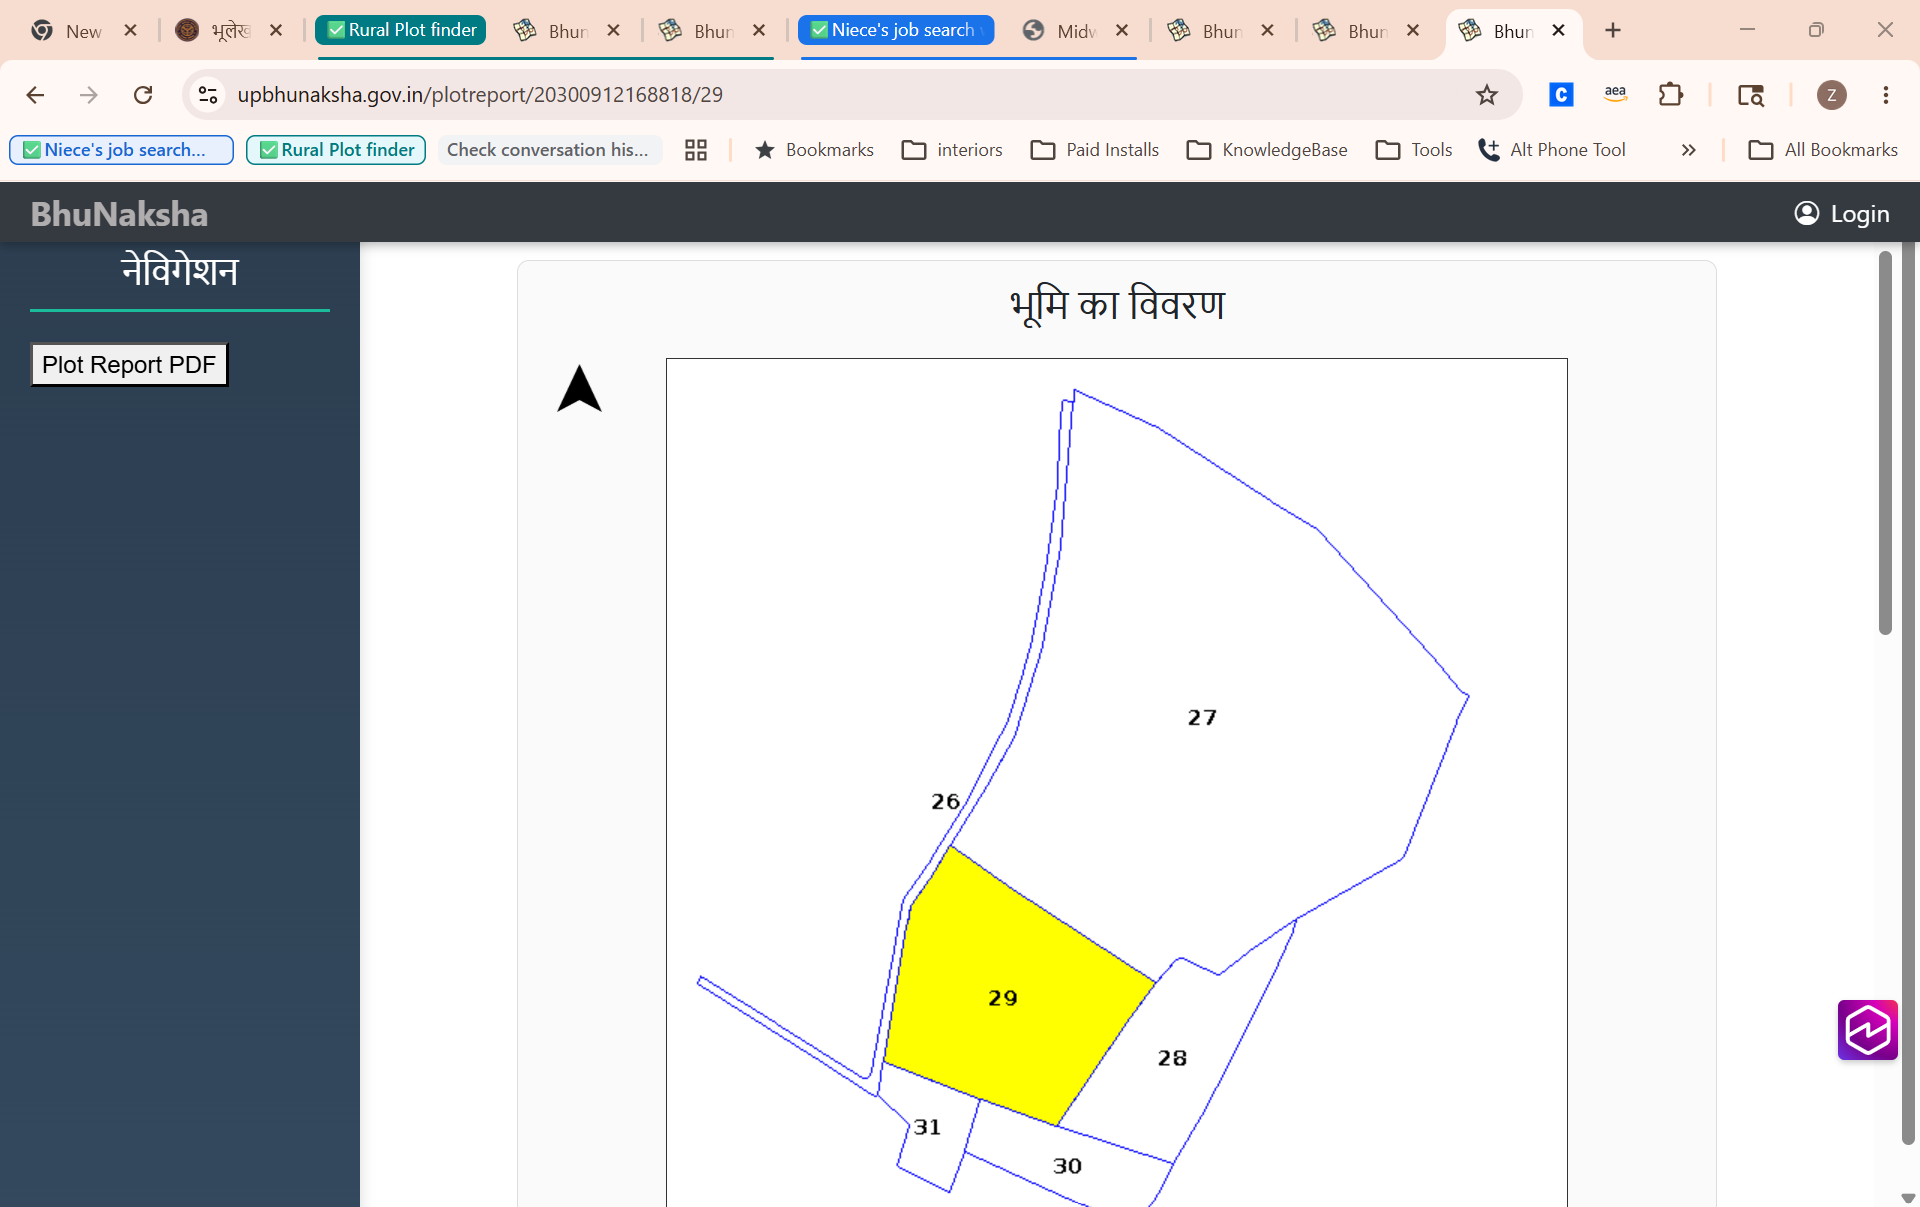
On the plot report page, click "Plot Report PDF" on the left sidebar to download the official map PDF. Repeat for each Gaata number. प्लॉट रिपोर्ट पेज पर बाएं साइडबार में "Plot Report PDF" पर क्लिक करें। प्रत्येक गाटा के लिए दोहराएं।
7
Important: Before moving to the next step, confirm your complete list of Gaata numbers. Cross-check what appeared in your Bhulekh search results (Step 3) against what Claude extracted from your Khatoni (Step 2). Write down the final confirmed list — you will enter each one individually in Step 5. महत्वपूर्ण: अगले चरण से पहले, अपनी गाटा संख्याओं की पूरी सूची की पुष्टि करें। चरण 2 और 3 के परिणाम मिलाएं और अंतिम सूची नोट करें।
BhuNaksha homepage
BhuNaksha homepage — select District, Tehsil, Village on the leftBhuNaksha होमपेज — बाईं ओर जिला, तहसील, ग्राम चुनें
Village map loaded
Village cadastral map loaded — all plots visible as numbered shapesग्राम भूकर मानचित्र लोड — सभी भूखंड संख्यायुक्त आकारों में दिखते हैं
Single plot selected with info panel
Plot selected — the info panel on the right shows all co-owners and areaभूखंड चुना गया — दाईं ओर सभी सह-स्वामी और क्षेत्रफल दिखता है
Plot report page
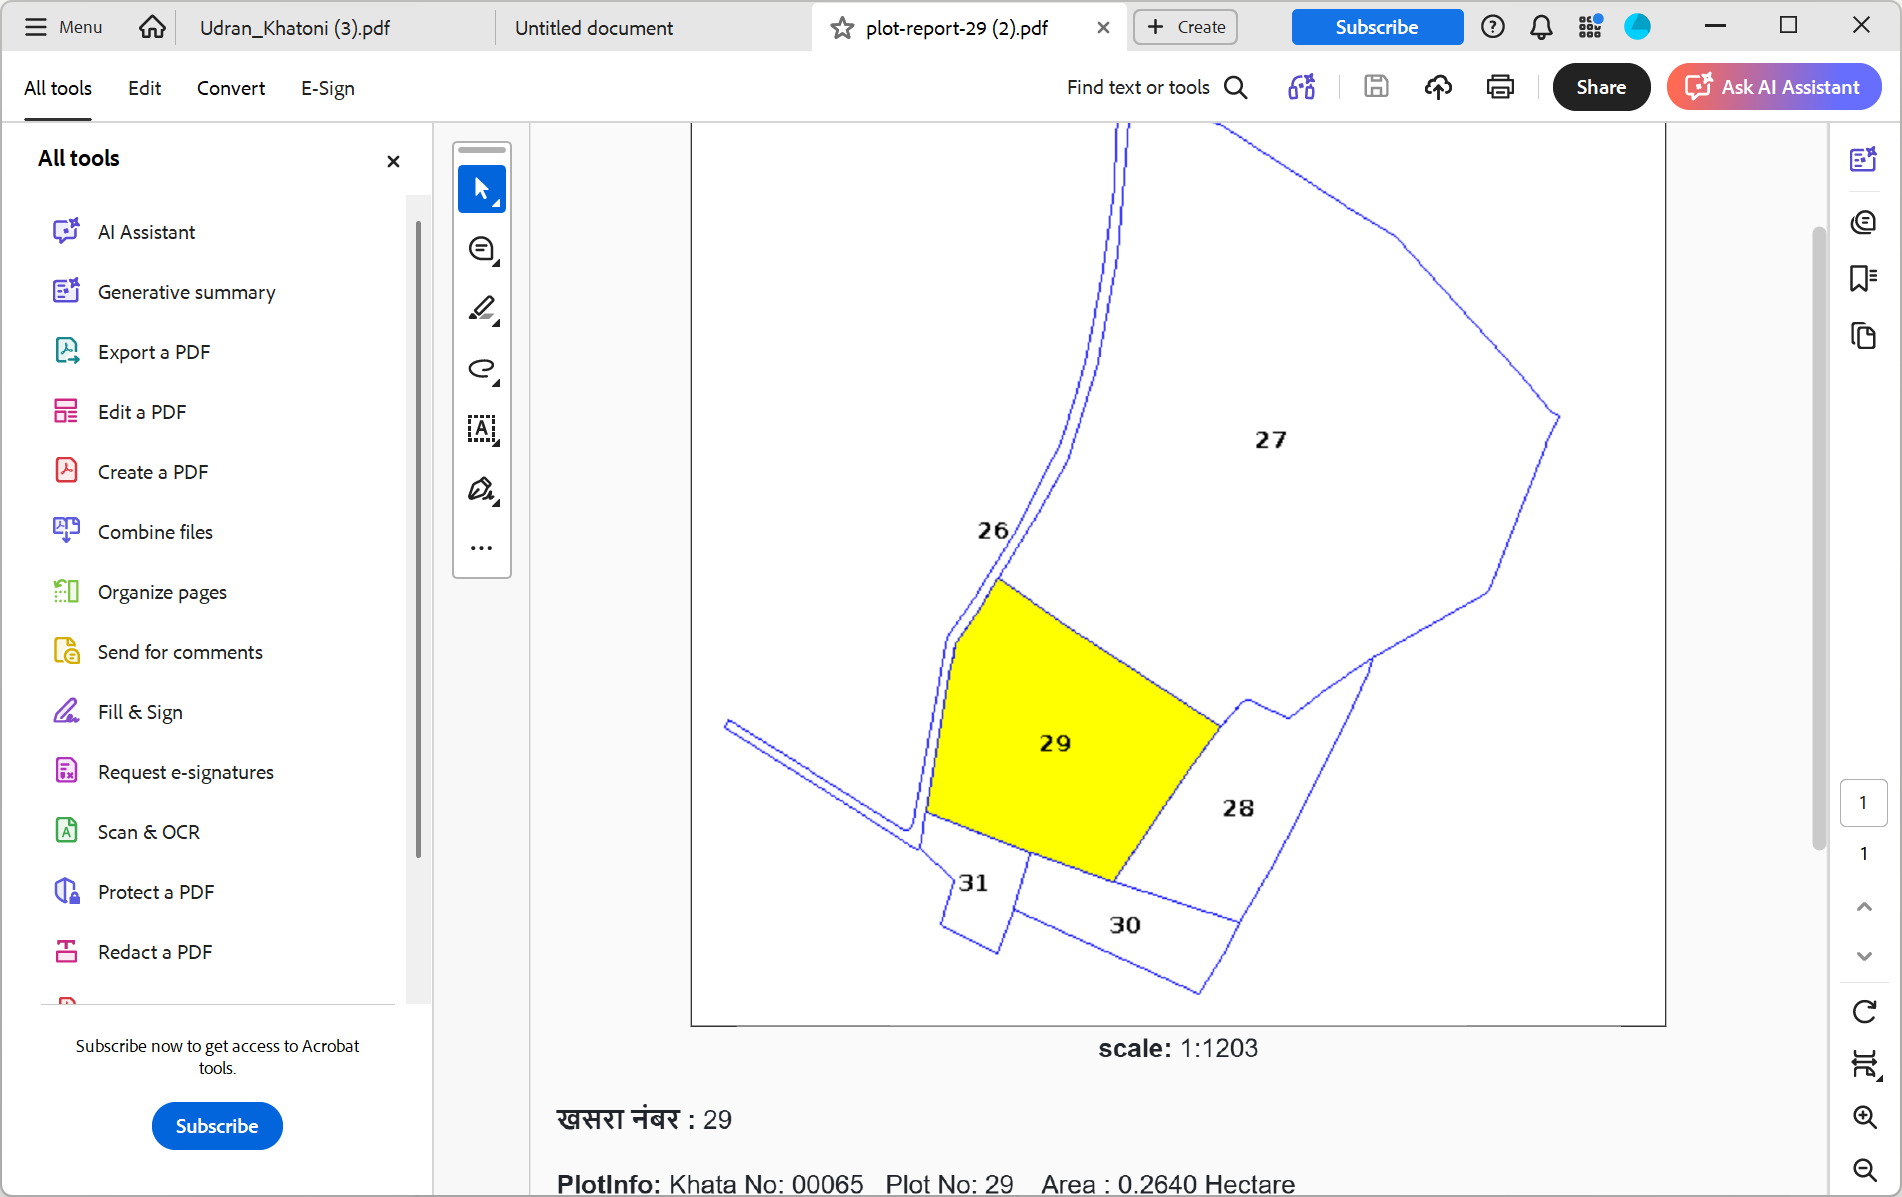
Plot report page — the selected gaata is highlighted in yellow, PDF button on leftप्लॉट रिपोर्ट पेज — चुना गया गाटा पीले रंग में, PDF बटन बाईं ओर
Downloaded plot PDF
The downloaded Plot Report PDF — official भूमि का विवरण map showing the plot shape, scale, and detailsडाउनलोड की गई प्लॉट रिपोर्ट PDF — आधिकारिक भूमि का विवरण मानचित्र
💡 What is the gisCode?💡 gisCode क्या है?
It is a combined number made up of your District code + Tehsil code + Village code joined together. Claude will have identified all three codes in Step 2 when it read your Khatoni. यह आपके जिला कोड + तहसील कोड + ग्राम कोड को एक साथ जोड़कर बना संयुक्त नंबर है। Claude ने चरण 2 में ये सभी कोड पहचाने होंगे।
5
Collect Plot Boundary Coordinates भूखंड सीमा के निर्देशांक एकत्र करें

This is the most hands-on step — and the key to the whole exercise. You'll use a small script in the browser's developer tools to collect the corner coordinates of each plot directly from the BhuNaksha map. Don't be put off by the word "script" — you're just copying and pasting a block of text. यह सबसे व्यावहारिक चरण है। आप ब्राउज़र के developer tools में एक छोटी स्क्रिप्ट का उपयोग करके प्रत्येक भूखंड के कोने के निर्देशांक एकत्र करेंगे।

1
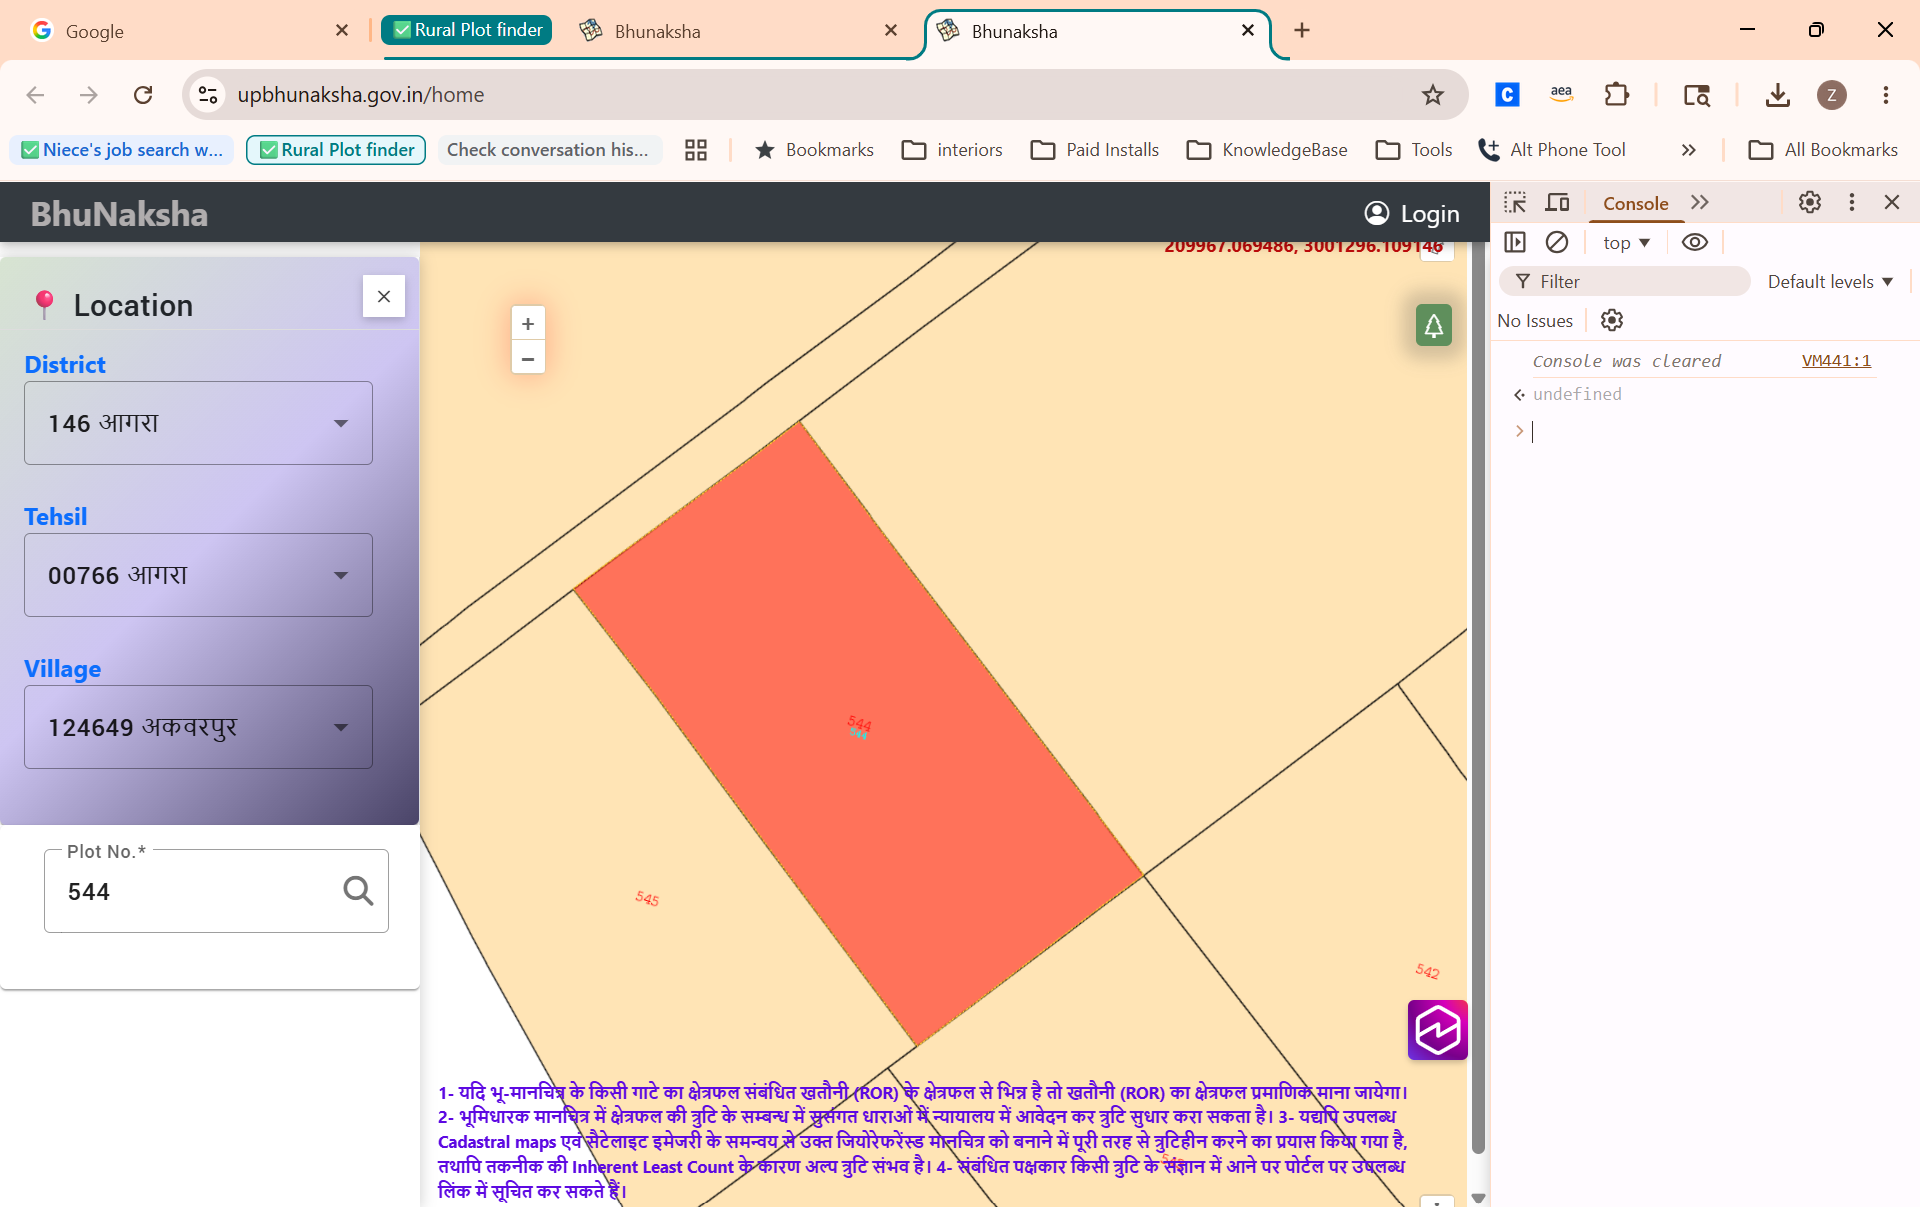
On BhuNaksha with your village loaded, press F12 on your keyboard (or right-click anywhere on the page and select "Inspect"). This opens the browser's Developer Tools — a panel used by web developers, but you only need the Console tab. BhuNaksha पर अपने गाँव के साथ, F12 दबाएं। Developer Tools खुलेगा — आपको केवल Console टैब चाहिए।
2
Click the Console tab at the top of the developer tools panel. Developer tools पैनल में Console टैब पर क्लिक करें।
3
Click inside the console, then copy and paste the entire script below and press Enter. You only need to do this once. Console में क्लिक करें, फिर नीचे दी गई पूरी स्क्रिप्ट कॉपी-पेस्ट करें और Enter दबाएं। यह एक बार करना है।
window._plots = {};
window._currentPlot = null;

window.startPlot = function(gaata) {
  window._currentPlot = String(gaata);
  if (!window._plots[window._currentPlot]) {
    window._plots[window._currentPlot] = [];
  }
  console.log('Now collecting for Gaata ' + gaata + '. Shift+click the corners.');
};

window.undoLast = function() {
  if (!window._currentPlot) return;
  window._plots[window._currentPlot].pop();
  console.log('Last point removed.');
};

window.getResults = function() {
  console.log(JSON.stringify(window._plots, null, 2));
};

document.addEventListener('click', function(e) {
  if (!e.shiftKey || !window._currentPlot) return;
  var el = document.querySelector('.ol-mouse-position');
  if (!el || !el.textContent.trim()) return;
  var coords = el.textContent.trim().split(',').map(Number);
  var pts = window._plots[window._currentPlot];
  if (pts.length && pts[pts.length-1][0] === coords[0]) return;
  pts.push(coords);
  console.log('Gaata ' + window._currentPlot + ' — point ' + pts.length + ': ' + coords);
});

console.log('Ready! Type startPlot(GAATA_NUMBER) to begin each plot.');
4
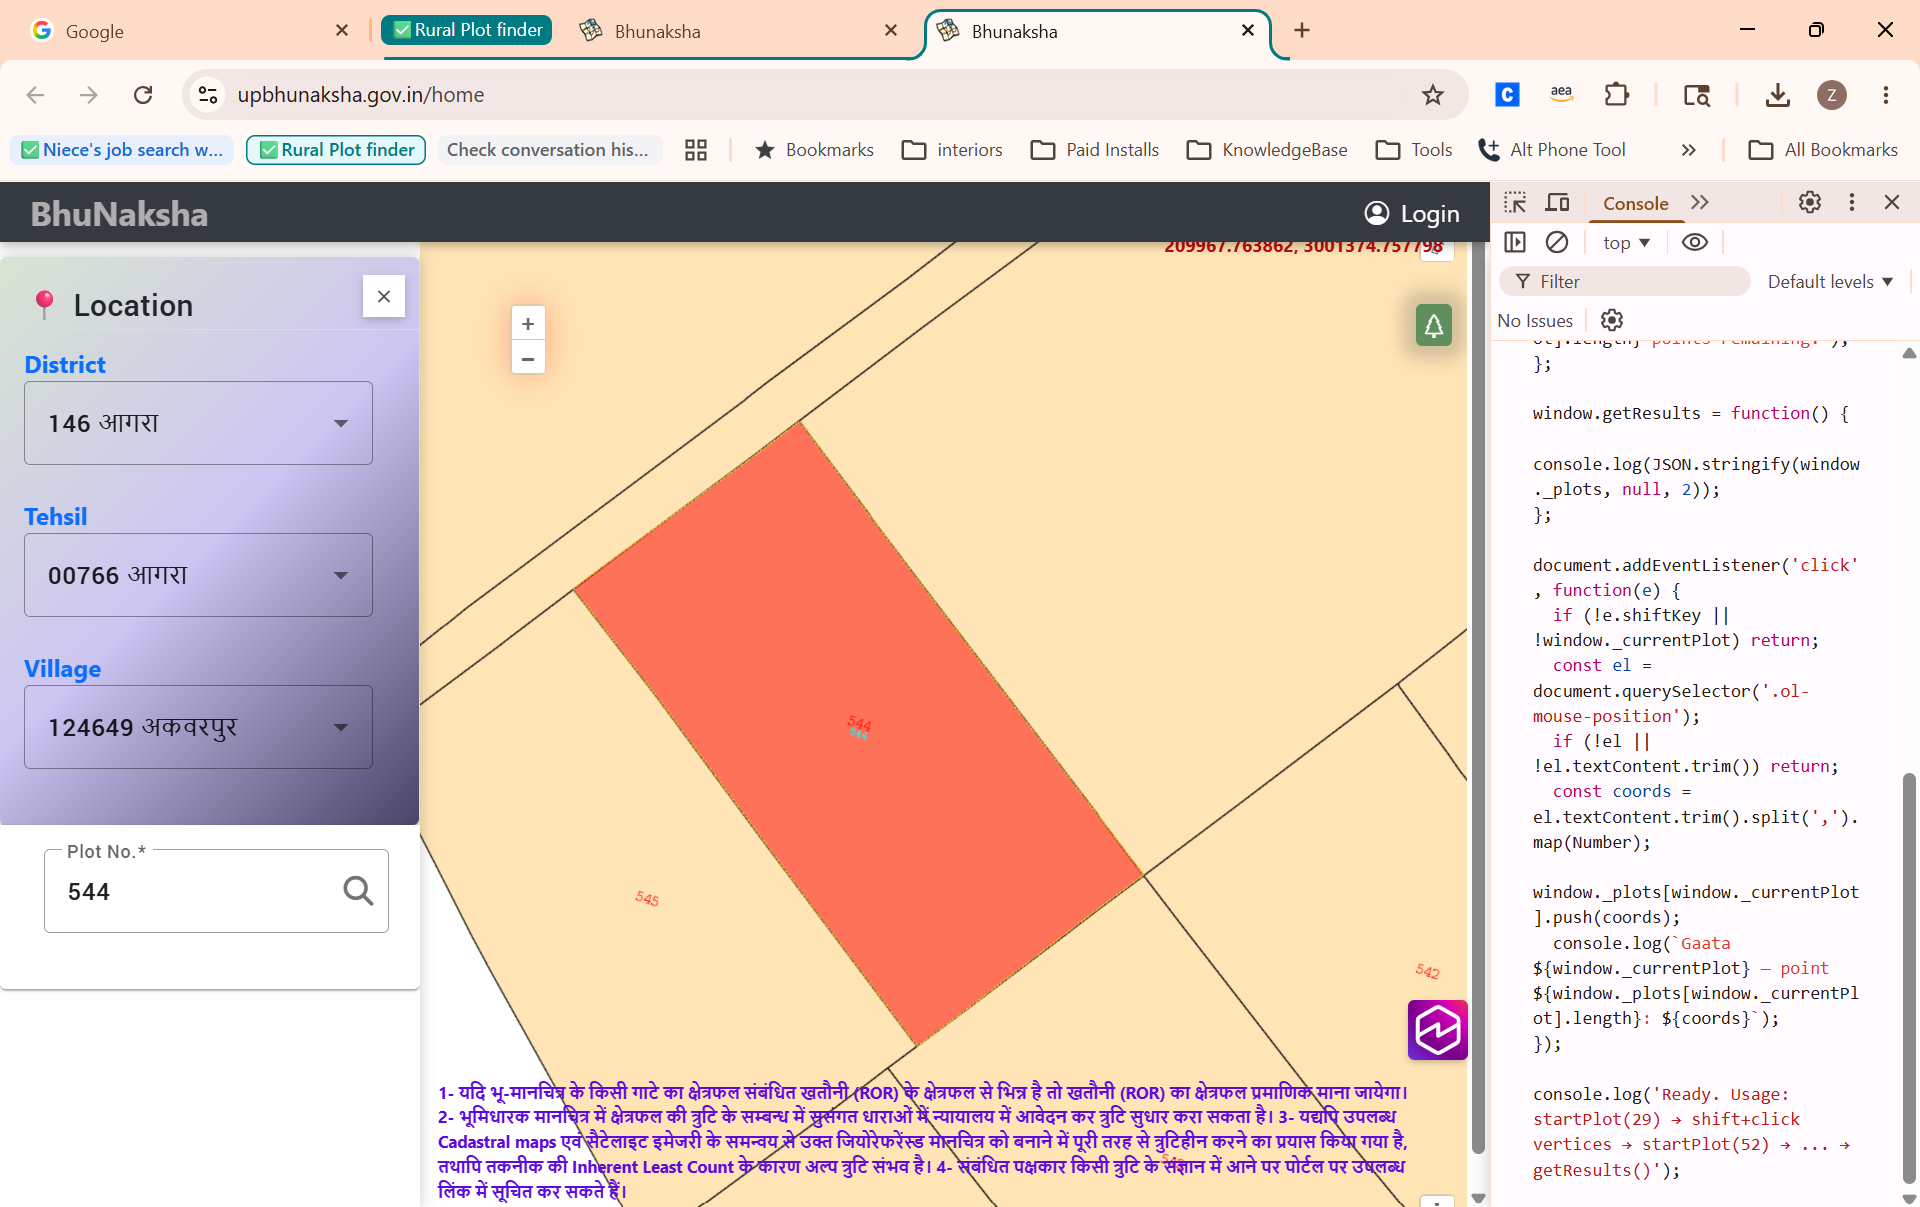
For your first Gaata: type its number in the Plot No. field on the BhuNaksha left panel and press the search icon. The map will zoom to that plot and highlight it in orange. अपने पहले गाटे के लिए: BhuNaksha के बाईं पैनल में Plot No. में उसकी संख्या टाइप करें और खोज आइकन दबाएं।
5
Zoom in on that plot on the map so it fills most of your screen — this makes it easier to click the corners accurately. उस भूखंड पर ज़ूम इन करें ताकि वह आपकी स्क्रीन का अधिकांश भाग भर ले।
6
In the Console, type startPlot(GAATA_NUMBER) — for example startPlot(29) — and press Enter. You'll see a confirmation message. Console में startPlot(गाटा_संख्या) टाइप करें — जैसे startPlot(29) — और Enter दबाएं।
7
Now hold Shift and click on each corner of the highlighted plot on the map. Aim for the vertices (pointy corners) of the shape. You'll see each point logged in the console as you click. 4–6 clicks is enough for most plots. अब मानचित्र पर हाइलाइटेड भूखंड के प्रत्येक कोने पर Shift पकड़कर क्लिक करें। अधिकांश भूखंडों के लिए 4–6 क्लिक पर्याप्त हैं।
8
Repeat steps 4–7 for every Gaata in your list. If you accidentally click the wrong spot, type undoLast() in the console to remove it. अपनी सूची के प्रत्येक गाटे के लिए चरण 4–7 दोहराएं। गलत क्लिक हो तो console में undoLast() टाइप करें।
9
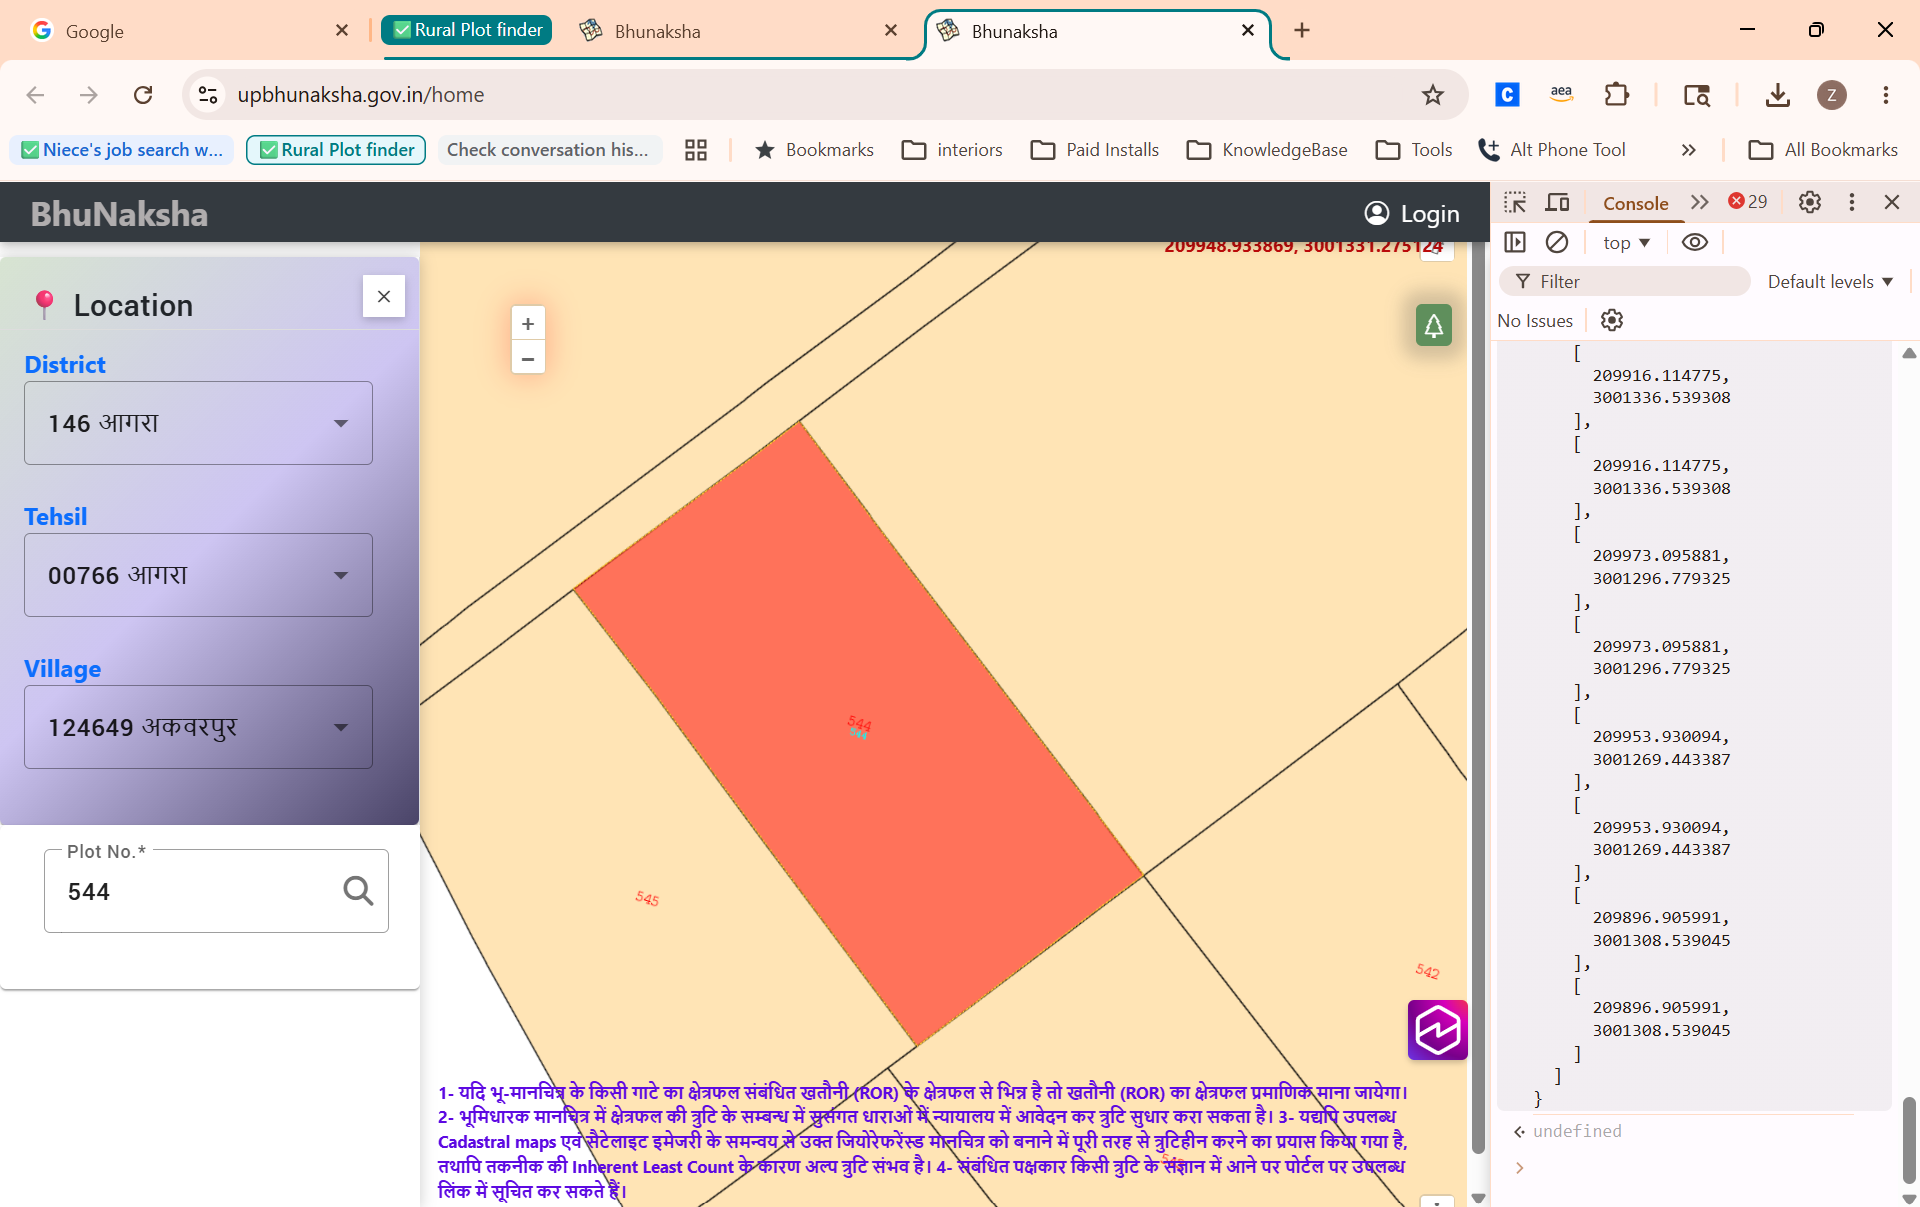
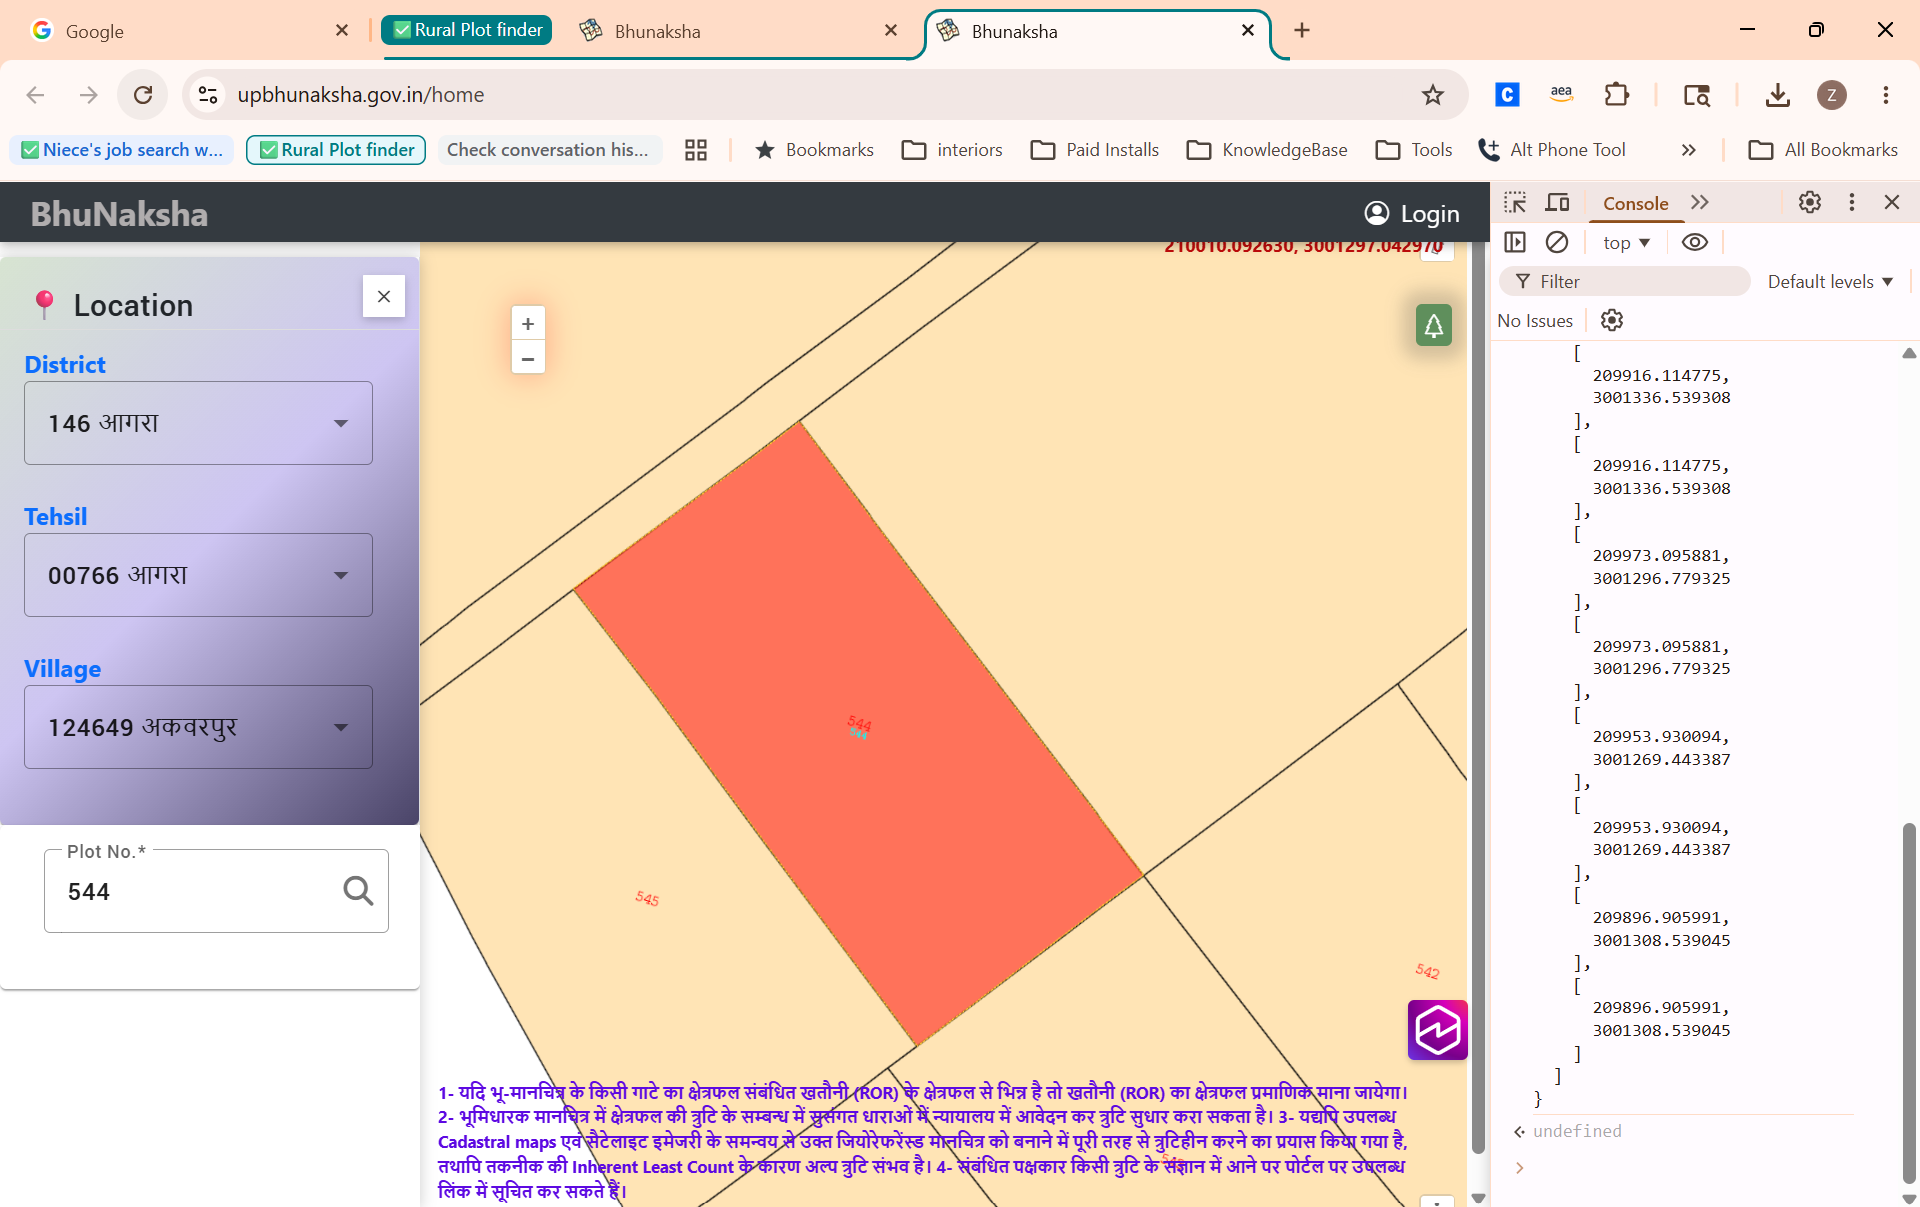
Once all plots are done, type getResults() in the console and press Enter. A block of structured text will appear — select it all, copy it, and keep it ready for the next step. सभी भूखंड पूरे होने पर, console में getResults() टाइप करें। एक structured text ब्लॉक दिखेगा — उसे सभी चुनें, कॉपी करें और अगले चरण के लिए तैयार रखें
📋 What is this "structured text block"?📋 यह "structured text block" क्या है? It's called a JSON object — think of it as an organised list where each plot number is a label, and underneath it are the coordinate pairs you just clicked. It will look something like {"29": [[209432, 3002167], [209475, 3002138], ...], "52": [[...], ...]}. Don't worry about understanding it — you're just going to paste it into Claude in the next step, and Claude handles the rest. इसे JSON ऑब्जेक्ट कहते हैं — इसे एक व्यवस्थित सूची समझें जहाँ प्रत्येक भूखंड संख्या एक लेबल है और उसके नीचे आपके क्लिक किए गए निर्देशांक हैं। आपको इसे समझने की जरूरत नहीं — बस अगले चरण में Claude में पेस्ट करें।
DevTools console open
Developer Tools open with Console tab — ready to paste the scriptDeveloper Tools खुला, Console टैब — स्क्रिप्ट पेस्ट करने के लिए तैयार
Script pasted and running
Script pasted — the console confirms it's ready and points begin loggingस्क्रिप्ट पेस्ट — console पुष्टि करता है और बिंदु लॉग होने लगते हैं
Plot zoomed in with coordinates
Plot zoomed in — Shift+click each corner; coordinates appear in the console on the rightभूखंड ज़ूम — प्रत्येक कोने पर Shift+क्लिक; निर्देशांक दाईं ओर console में दिखते हैं
Coordinates output in console
getResults() output — the full list of all plots and their coordinates, ready to copygetResults() आउटपुट — सभी भूखंडों और निर्देशांकों की पूरी सूची, कॉपी के लिए तैयार
6
Ask Claude to Convert Coordinates & Generate a KML File Claude से निर्देशांक परिवर्तित करवाएं और KML फ़ाइल बनवाएं

The coordinates you collected are in a technical format called UTM (used for precise mapping) — not the standard lat/long format that Google Maps understands. Claude will convert them and package everything into a KML file — a standard format for storing map shapes. आपके एकत्र निर्देशांक UTM फॉर्मेट में हैं — Google Maps के lat/long फॉर्मेट में नहीं। Claude उन्हें convert करके एक KML फ़ाइल बनाएगा।

1
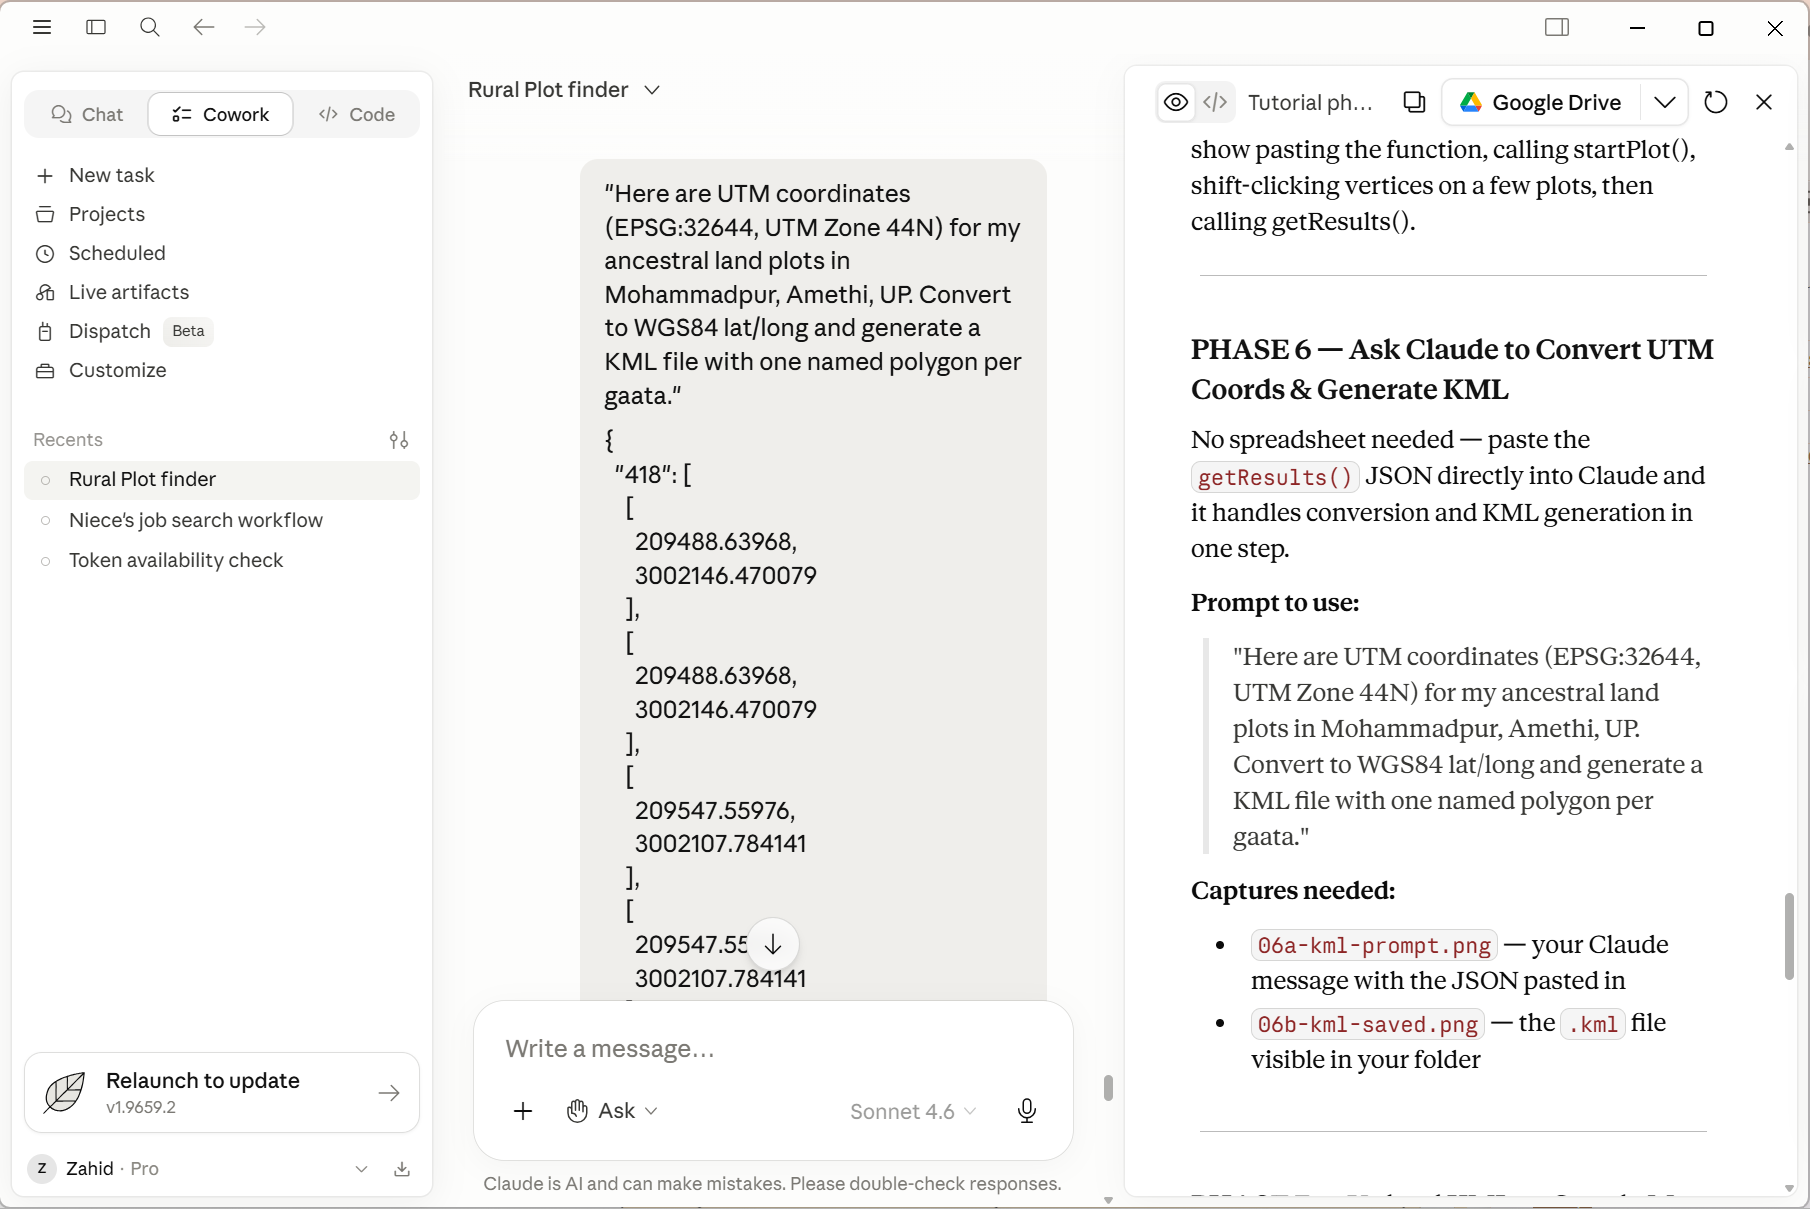
Go back to Claude. Start a new message, type the prompt below, and then paste the JSON block you copied in Step 5 directly after the prompt text. Claude पर वापस जाएं। नया संदेश शुरू करें, नीचे दिया प्रॉम्प्ट टाइप करें, और चरण 5 में कॉपी किया JSON ब्लॉक उसके बाद पेस्ट करें
Copy this promptयह प्रॉम्प्ट कॉपी करें "Here are UTM coordinates (EPSG:32644, UTM Zone 44N) for my ancestral land plots in [your village name], [your district], Uttar Pradesh. Convert all coordinates to standard WGS84 lat/long and generate a KML file with one named polygon per gaata. Save the KML file to my folder." "यहाँ मेरे पैतृक भूखंडों के UTM निर्देशांक हैं (EPSG:32644, UTM Zone 44N), [आपके गाँव का नाम], [जिला], उत्तर प्रदेश। सभी निर्देशांकों को WGS84 lat/long में convert करें और प्रत्येक गाटे के लिए एक नामित polygon के साथ KML फ़ाइल बनाएं।"
2
Claude will convert all the coordinates, generate the KML file, and save it. You'll see a link to download or open it. Claude सभी निर्देशांक convert करेगा, KML फ़ाइल बनाएगा और सेव करेगा।
3
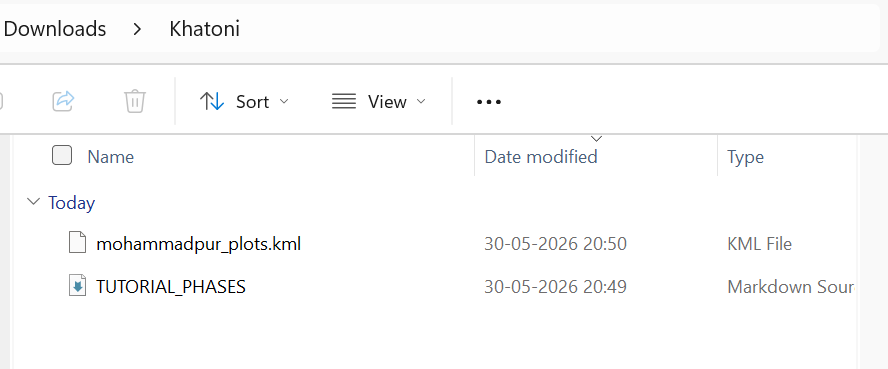
Save the .kml file to a folder you can easily find — you'll need it in the next step. .kml फ़ाइल को एक आसानी से मिलने वाले फोल्डर में सेव करें — अगले चरण में इसकी जरूरत होगी।
KML generation prompt in Claude
The prompt with coordinates pasted — Claude processes and generates the KMLनिर्देशांक सहित प्रॉम्प्ट — Claude KML प्रोसेस और बनाता है
KML file saved to folder
The KML file saved to your folder and ready to importKML फ़ाइल फोल्डर में सेव — import के लिए तैयार
📋 What is a KML file?📋 KML फ़ाइल क्या है? KML (Keyhole Markup Language) is a standard file format that Google Maps, Google Earth, and many other mapping tools understand. It stores geographic shapes — in this case, a polygon for each of your plots, named by Gaata number. In the next step you'll import it into Google My Maps to see all your plots at once on a real map. KML (Keyhole Markup Language) एक मानक फ़ाइल प्रारूप है जिसे Google Maps और अन्य मानचित्रण उपकरण समझते हैं। इसमें भौगोलिक आकार संग्रहीत होते हैं — इस मामले में, आपके प्रत्येक भूखंड के लिए एक polygon।
7
View Your Plots on Google My Maps Google My Maps पर अपने भूखंड देखें

This is the moment everything comes together. You'll import your KML file into Google My Maps, switch to satellite view, and see the exact fields your family owns — as actual plots of land visible from space. यह वह क्षण है जब सब कुछ एक साथ आता है। आप अपनी KML फ़ाइल Google My Maps में import करेंगे और अपने परिवार के खेत उपग्रह दृश्य में देखेंगे।

1
Go to mymaps.google.com (sign in with your Google account if asked). mymaps.google.com पर जाएं (यदि पूछा जाए तो Google खाते से साइन इन करें)।
2
Click "Create a new map". "Create a new map" पर क्लिक करें।
3
In the left panel, click "Add layer" and then "Import". In the file picker that opens, select your .kml file. बाईं पैनल में "Add layer" फिर "Import" पर क्लिक करें। खुले file picker में अपनी .kml फ़ाइल चुनें।
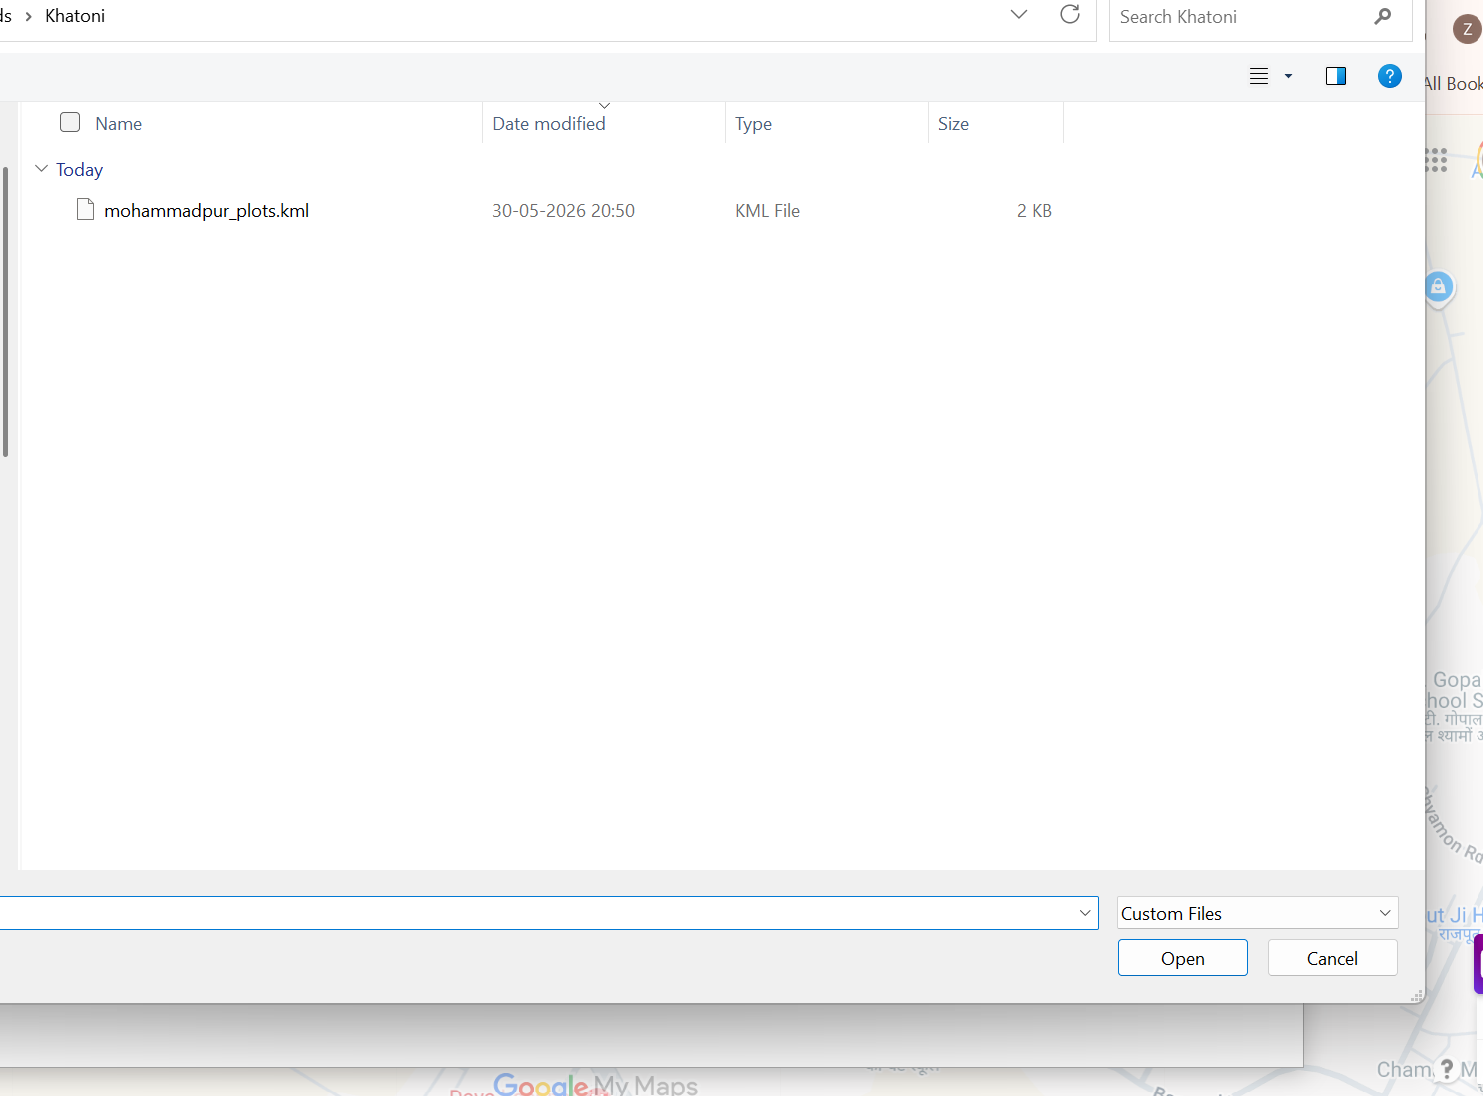
4
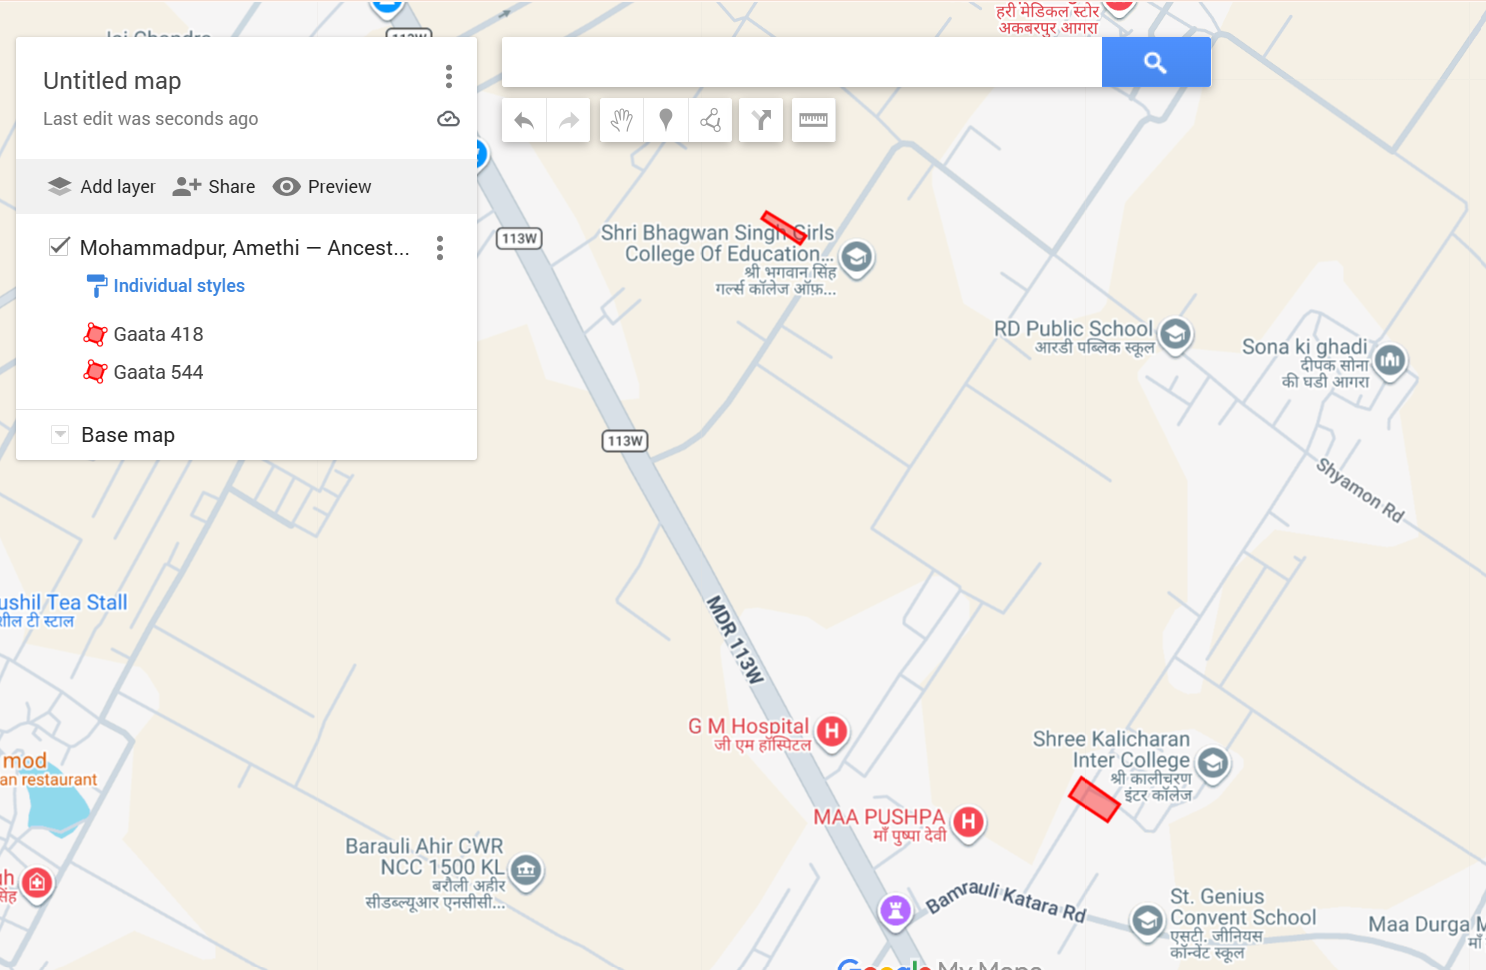
Your plots will appear as coloured polygons on the map. Each one will be labelled with its Gaata number. आपके भूखंड मानचित्र पर रंगीन polygons के रूप में दिखेंगे, प्रत्येक अपनी गाटा संख्या के साथ।
5
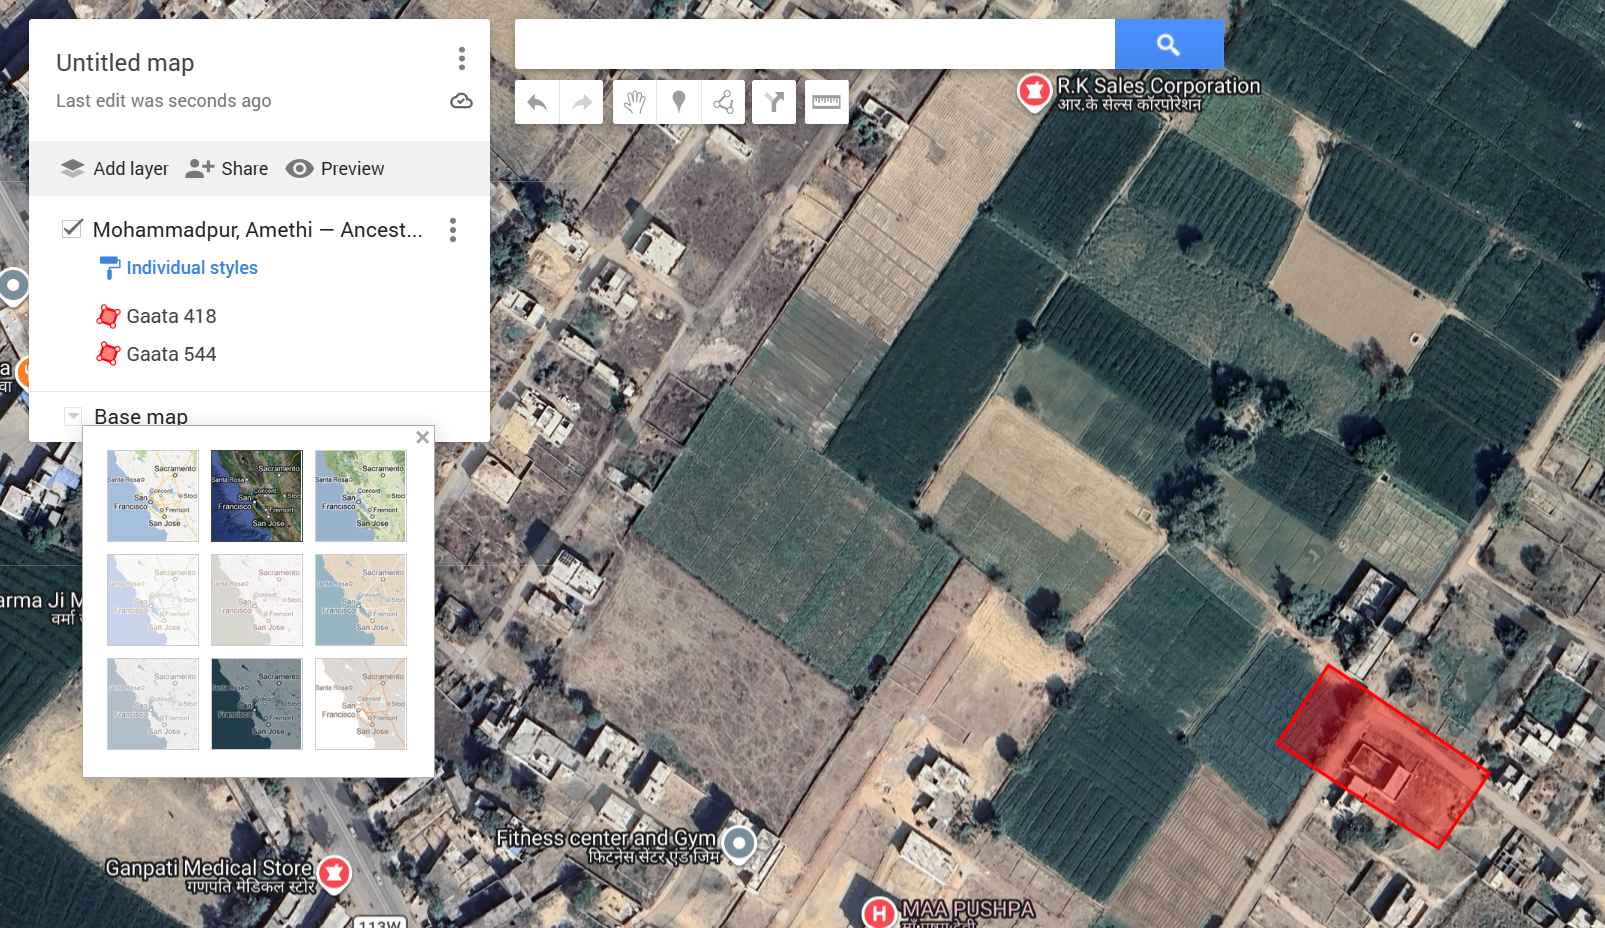
Click "Base map" at the bottom of the left panel and select "Satellite". Your plot polygons will now appear overlaid on real aerial imagery. Zoom in on any plot to see how it matches the actual field on the ground. बाईं पैनल के नीचे "Base map" पर क्लिक करें और "Satellite" चुनें। आपके भूखंड polygons अब वास्तविक उपग्रह चित्रों पर दिखेंगे।
6
Click the Share button to get a link you can send to family members, or use Preview to see the clean public-facing version of your map. Share बटन से परिवार के सदस्यों को लिंक भेजें, या Preview से अपने मानचित्र का सार्वजनिक संस्करण देखें।
Importing KML file
The file import dialog — select your .kml file to load all polygonsफ़ाइल import dialog — सभी polygons लोड करने के लिए .kml फ़ाइल चुनें
Polygons loaded on map
Plots appear as named polygons on the map — each labelled with its Gaata numberभूखंड नामित polygons के रूप में दिखते हैं — प्रत्येक गाटा संख्या के साथ
Satellite view with plot polygon
Satellite view — the polygon precisely outlines the actual field. This is your ancestral land.उपग्रह दृश्य — polygon वास्तविक खेत की सटीक सीमा बनाता है। यह आपकी पैतृक भूमि है।
🎉 You're done!🎉 आप पूरा कर चुके हैं!
You've successfully located, documented, and mapped your family's ancestral land. The Google My Maps link is shareable — you can send it to relatives around the world so they too can see exactly where the family's plots are located. आपने अपने परिवार की पैतृक भूमि को सफलतापूर्वक खोजा, दस्तावेज़ीकृत और मानचित्रित किया। Google My Maps लिंक share करने योग्य है — आप इसे दुनिया भर में रिश्तेदारों को भेज सकते हैं।